Table of Contents
Alignment
All fixtures you want to use as automated follow spots have to be accurately aligned into the defined coordinate system. zactrack computes the exact position and rotation of all fixtures regarding the defined origin by the following alignment process.
By aiming the beam of each fixture onto 4 calibration points, zactrack calculates the current position and rotation.
How to align the fixtures
Aim the fixture beam on 4 calibration points
- Tap
Alignmentin section “Fixtures”
- Tap
Editin the row of the fixture you want to align
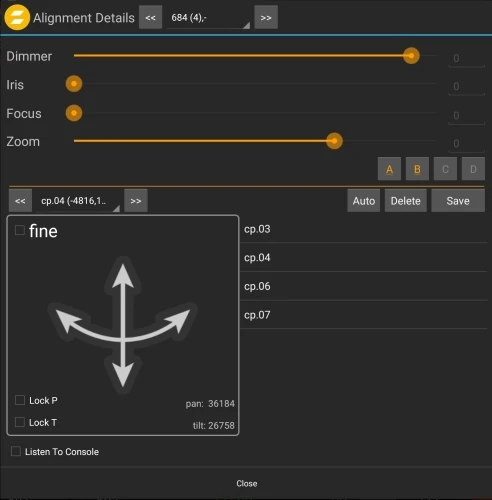
- Adjust the 4 parameters Dimmer / Iris / Zoom / Focus with the sliders on top to get the smallest and brightest possible beam of the fixture
Note: 4 different parameter presets can be stored by a long press onA,B,CorDon the right hand side
- Aim the fixture beam roughly on the first calibration point
- by using the PAN / TILT touchpad on the tablet
- by using the lighting console and tapping
Listen to Console
- Tap on
Fineat the top left corner of the PAN / TILT touchpad on the tablet
- Center the beam on the first calibration point more precisely
- Manually by using the PAN / TILT touchpad on the tablet
- Tap
Save
- Repeat the last 4 steps for the other 3 calibration points
Note: PAN & TILT values of all 4 calibration points should clearly differ to achieve accurate alignment results.
- Tap
Close
Calculate the position and rotation
- Tap
Alignmentin section “Fixtures”
- Center the beam of all fixtures you want use as follow spots on 4 measured calibration points as described above
Note: If you haven't measured the calibration points yet, please do so as described in Measure Points
- Select the fixtures you want to align by enabling the checkbox on the left hand side of the window
- Tap
Starton the bottom right corner
Note: Tablet will BEEP after successful calculation and automatically download the result from the server
Green: Good alignment result
Yellow: Moderate alignment result
→ Check how accurate the beam is centered on the 4 calibration points
Red: Bad alignment result
→ Check how accurate the beam is centered on the 4 calibration points
→ Check if the fixture aims on the right calibration points and if all points are measured correctly
- Tap
Close
- Tap on
Lock Y
- Move the fixture along the X-axis by moving the finger from left to right and back using the touchpad. The movement has to picture a straight line on the X-axis
Note: If the movement does not picture a straight line please redo the alignment process!
Tip: You are able to speed up the movement by toggling onX10
Single Auto alignment
- Turn on the zactrack Puck and place it on the first calibration point
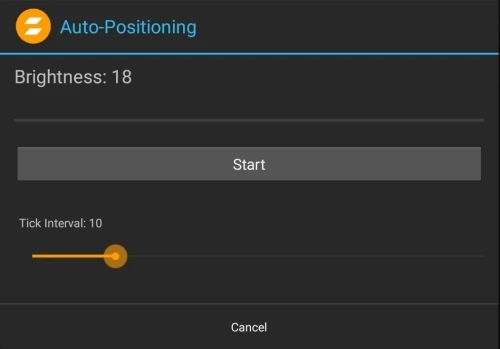
- Tap
Auto
Note: Make sure “External Light Sensor” is enabled with the correct ip address in the System Settings
- Tap
Start
Note: You can change the speed of the fixture movement by moving the slider left or right
- The beam of the fixture will be centered on the calibration point automatically
Note: Please take care that no external influences will affect the Auto alignment
Multiple Auto alignment
- Tap
Alignmentin the section Fixtures
- Tap
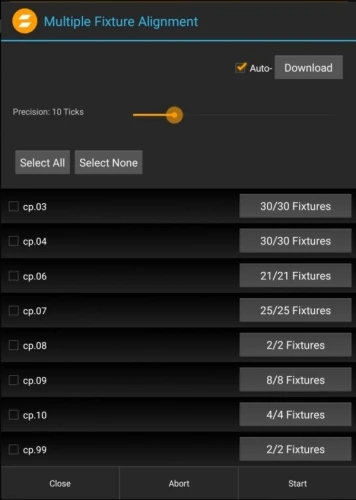
Align Multiple …at the bottom
- Select the calibration point on which you want to align multiple fixtures by enabling the checkbox at the left hand side
Note: Make sure “External Light Sensor” is enabled with the correct ip address in the System Settings
- Tap
Start
Note: You can change the speed of the fixture movement by moving the slider left or right
- The beam of all selected fixtures will be centered on the calibration point sequentially
Note: Please take care that no external influences will affect the Auto alignment


