User Tools

Site Tools


Sidebar

zactrack manual

[[smart:start]] \\

System Overview
Safety Standards
Hardware Overview
Software Overview
Network
UWB Radiotracking


PREPARATIONS


ZACTRACK SETUP


Hardware


zactrack 3 APP


Autofunctions APP


[[manual:Tracking Server]]\\

zactrack site notice: Homepage

manual:mini_system_settings

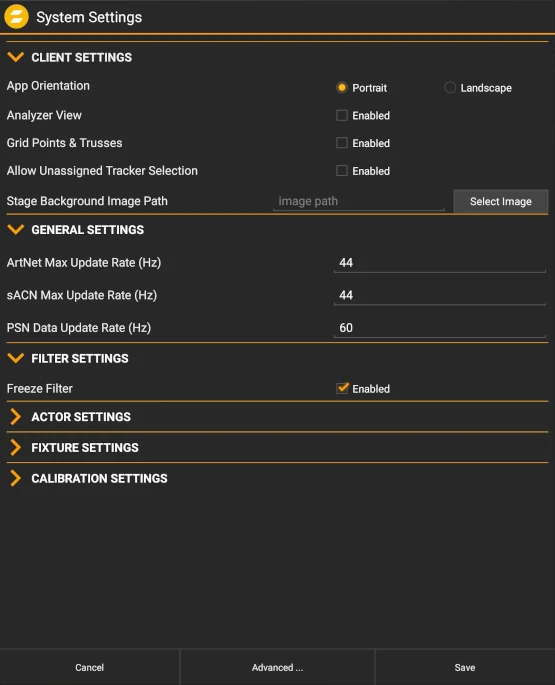
System Settings

Reach this dialog via the menu.

CLIENT SETTING

App Orientation

Specifies the orientation of the Android client (default is portrait-mode).

Enable Analyzer View

If the option Analyzer View is enabled, an additional tab ANALYZER will be shown in the app's navigation bar.

This view contains additional, advanced information about several internal application and tracking processes.

Grid Points & Trusses

By activating this setting, you can access the Grid Points and Trusses pages in the show editor.

Allow Unassigned Tracker Selection

Background Image Selection

Provides the opportunity to upload an image that will be use as background image in the live view.

GENERAL SETTINGS

ArtNet Max Update Rate (Hz)

max. refresh rate of the ArtNet (if it is used) up to 90

sACN Max Update Rate (Hz)

max. refresh rate of sACN (if it is used) up to 90

PSN Data Update Rate (Hz)

actual refresh rate of PSN data (if it is used) up to 90

FILTER SETTINGS

Freeze Filter

The freeze filter enables a steady fixture beam even while small actor movements. The freeze Filter can be adjusted for each Actor on a control channel. 0% means no freeze (every little movement is recognized), 100% freezes the actual position. The fixture is still on the point and doesn't follow the Tag.

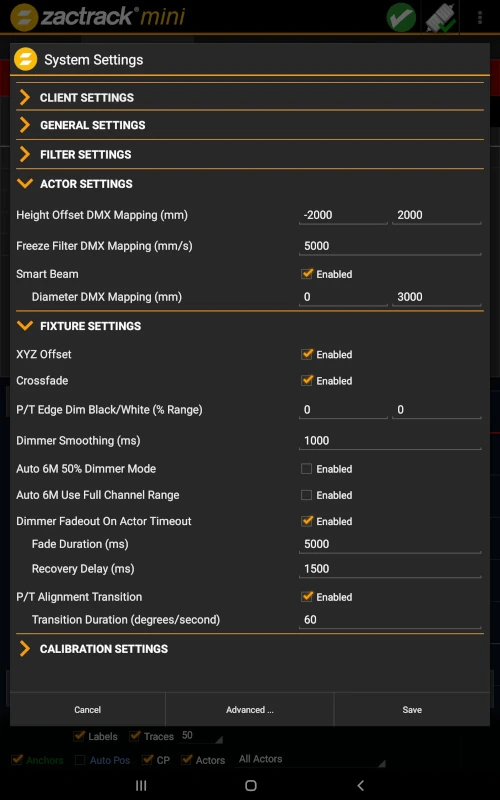
ACTOR SETTINGS

Height Offset DMX Mapping

It is possible the set a hight offset on each tag via the console or in the live view. If the tag is mounted as an example on the shoulders, but the middle of the light beam has to be on the chest you can do this with the height offset. With these values it is possible to arrange the DMX range to this height. DMX is an 8 bit value from 0-255, as an example 0 means -2000mm offset and 255 means 2000m offset.

Freeze filter DMX Mapping

The freeze filter is used for removing small movements. The light stands still on the tracked person and small movements with the shoulders don't move the fixture. The strength of it can be arranged in the live view or on the console. The meaning of the value is: 0 no freeze (each movement is transferred to the fixture) and 255 freeze position (the actor can move away and the fixture stays on the freezed point). The intensity of the freeze between 0 and 254 is set with these settings.

Smart Beam

The smart beam allows a constant beam size, if it is physically possible. If the correct values for the zoom, iris and focus area are in the fixture type the system automatically calculates the needed values for zoom iris and focus. The value of the DMX Mapping is for controlling the size of the beam via the console.

FIXTURE SETTINGS

XYZ Offset

This option determines whether or not the server listens to the fixture type XYZ offset channel sent from the console (see zactrack Fixture Types).

Crossfade

This option determines whether or not the server listens to the fixture type crossfade channel sent from the console (see zactrack Fixture Types).

P/T Edge Dim Black/White (% Range)

If a fixture reaches its physical PAN or TILT limits while tracking an actor, it might have to perform a flip to continue tracking. By default, the dimmer value will not change during this flip.

By adjusting the values P/T Edge Dim Black/White (% Range), you can define fade out areas on the edge of available pan/tilt ranges. The dimmer value starts to fade out upon reaching the second value (white) and reaches total blackness (0) upon reaching the first value (black). In many cases, this leads to the flip being less visible due to it happening in total darkness.

Dimmer Smoothing

The value of the Dimmer Smoothing says how long it takes to dim up the light on the console value, if the tag activates in the system.

Auto 6M 50% Dimmer Mode

If this option is activated, the dimmer value from the console will merged directly like the other channels (see for details).
When this option is deactivated, the system calculates the final dimmer value as follows:

final_value = dmx_min + auto_value * console_value * (dmx_max - dmx_min)

with console_value depending on the option Auto 6M Use Full Console Range.

Auto 6M Use Full Console Range

There are two different ways of how the multipliers are calculated, depending on whether or not the advanced property in the System Settings is enabled or not.

Option 1: Property "Auto 6M Use Full Channel Range" is enabled:

Let auto_value be the value calculated based on autofunctions/smart zoom and console_value the one received from the console on the fixture's input universe. Furthermore, let dmx_full_range_min and dmx_full_range_max be the theoretical dmx value limits, regardless of the limits set in the fixture's fixture type. Then the final channel value final_value is calculated by using the following formula:

multiplicator = 2 * ((console_value - dmx_full_range_min) / (dmx_full_range_max - dmx_full_range_min))
final_value = auto_value * multiplicator

For example, consider a fixture with an 8-bit IRIS channel (theoretical DMX values of 0-255), but a limited dmx range defined in its fixture type (e.g. DMX values of 0-131). With Auto 6M mode active…

  • …sending an IRIS value of 0 (0 % of theoretical dmx range) from the lighting console leads to the final IRIS value being 0, regardless of autofunctions or other factors (due to the multiplicator being 0 as well).

  • …sending an IRIS value of 127 (50 % of theoretical dmx range) from the lighting console leads to the final IRIS value being exactly the same as auto_value (due to the multiplicator being 1).

  • …sending an IRIS value of 255 (100 % of theoretical dmx range) from the lighting console leads to the final IRIS value being twice as big as auto_value (due to the multiplicator being 2).
Option 2: Property "Auto 6M Use Full Channel Range" is disabled:

Let auto_value be the value calculated based on autofunctions/smart zoom and console_value the one received from the console on the fixture's input universe. Furthermore, let dmx_min and dmx_max be the dmx limits as specified in the fixture's fixture type. Then the final channel value final_value is calculated by using the following formula:

multiplicator = 2 * ((console_value - dmx_min) / (dmx_max - dmx_min))
final_value = auto_value * multiplicator

For example, consider a fixture with an 8-bit IRIS channel (theoretical DMX values of 0-255), but a limited dmx range defined in its fixture type (e.g. DMX values of 0-131). With Auto 6M mode active…

  • …sending an IRIS value of 0 (0 % of limited dmx range) from the lighting console leads to the final DIMMER value being 0, regardless of autofunctions or other factors (due to the multiplicator being 0 as well).

  • …sending an IRIS value of 65 (50 % of limited dmx range) from the lighting console leads to the final IRIS value being exactly the same as auto_value (due to the multiplicator being 1).

  • …sending an IRIS value of 131 (100 % of limited dmx range) from the lighting console leads to the final IRIS value being twice as big as auto_value (due to the multiplicator being 2).

  • …sending an IRIS value of 255 (195 % of limited dmx range) from the lighting console leads to the final IRIS value being almost four times as big as auto_value (due to the multiplicator being 3.9).

Dimmer Fadeout On Actor Timeout

If an actor is completely lose in the system, the fixture dims down in the time of the fade duration. If a stable signal is coming back, after the recovery delay time the light fades up to the console value.

P/T Alignment Transition

When this setting is enabled, you can define the number of degrees the fixture should move pre second (default: 60 degrees/second). This setting can help to avoid “swinging” of the truss if the fixture moves to fast.

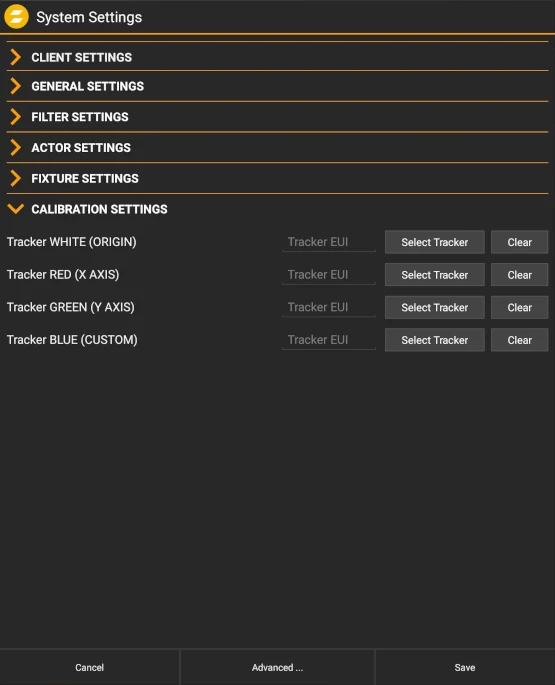
CALIBRATION SETTINGS

The system calibration uses 4 trackers as calibration points to measure and calculate the coordinate system. For proper calculations, the system needs to know which tracker occupies the role of the origin, x-axis, etc. Here you can specify that mapping.

Note: This must be a 1:1 mapping → one tracker can only act as one calibration point, and vice versa!


SUB TOPICS

manual/mini_system_settings.txt · Last modified: 2022/11/09 12:47 by zvonek