Sidebar
Table of Contents
Actor Live View
Actor List
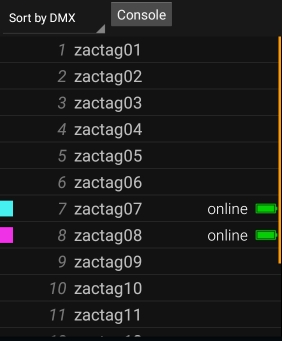
The actor live view lists information about all actors in the current show. Each listed element contains the following data (from left to right):
- Actor Color: If an actor is online (i.e. the tag is actively transmitting), it's color (in form of a colored rectangle) is shown on the left (see Add actors on how to change this color).
- (Battery) status: The text “online” indicates if an actor's tag is actively transmitting data. If available, a small icon also indicates the current battery level of a tag (green = (almost) full, yellow = medium level, red = almost empty).
Note: Battery levels are first shown a few minutes after a tracker comes online. There are also system setups that will always report the battery levels as unknown.
Click on an actor's row to change individual live settings.
Sort by ...
Change the way the actor list is sorted (dmx id, name or transponder id).
Console
This button sets all actor channels (Height and Preset) to console mode.
(Individual) Actor Live Settings

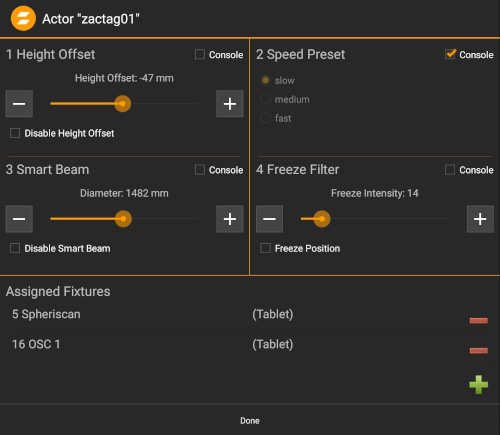
By clicking on a specific actor's row in the actor list, you can adjust several of its live settings. Here is an example setting of Actor “zactag01”
Height
Adjust the height of a specific actor. If your system is configured for 2D tracking, this basically sets the z-position of an actor. If it is configured for 3D tracking, this is an offset that is added to the z-position received from an actor's tag. See System Settings on how to change the tracking mode.
If the checkbox Console isn't active, this setting can be set manually from the tablet. Otherwise, the value is automatically determined by listening to the light console on the actor's specified control channel (see Add actors).
Smart Beam
This feature is only visible if the checkbox in the Actor Setting is set.(see System Settings).
If the checkbox Console isn't active, this setting can be set manually from the tablet. If the feature is enabled, you can adjust the desired fixture beam diameter. The zactrack server will try to set the zoom/iris channels of fixtures assigned to this actor such that the beam diameter at the actor's tag position matches this value as closely as physically possible.
Note: For this feature to work accurately, the physical zoom/iris limits for assigned fixture types has to be set correctly.
Speed Preset
Every fixture type has three different filter presets that result in different fixture behavior (see Speed Presets). Adjust this setting to specify the active speed preset of fixtures that are assigned to this actor.
If the checkbox Console isn't active, this setting can be set manually from the tablet.
Otherwise, the value is automatically determined by listening to the light console on the actor's specified control channel (see Add actors).
Freeze filter
If the checkbox Console isn't active, this setting can be set manually from the tablet.
Otherwise, the value is automatically determined by listening to the light console on the actor's specified control channel (see Add actors).
(Un)assign Fixtures
The bottom part of the dialog lists all fixtures assigned to this actor.
Press the + button to assign a fixture, press the - button to the right of an assigned fixture to unassign it.
Note: Only fixtures that are set to console assignment can be assigned manually. Other fixtures can only be assigned directly from the light console.


