Controlling grandMA3 via OSC
The zactrack server's OSC capability allows the realtime control of grandMA3 consoles.
Prerequisites
This page only documents the definition of OSC output for the console. Other setup steps are not covered in this article, so make sure that the following requirements are met:
Tracking input is available, either from a calibrated tracking system, PSN input or Proxy setup.
Network settings (interface IP) are compatible on both console and zactrack server, and both devices are connected via ethernet.
OSC output is enabled in the System Settings. Use the light interface port on the zactrack server. On PRO systems, one of the 2 additional network interfaces can also be used.
Enabling OSC on grandMA3
OSC needs to be activated and configured on the grandMA3 in order to process the commands coming from zactrack. OSC can be configured by accessing .
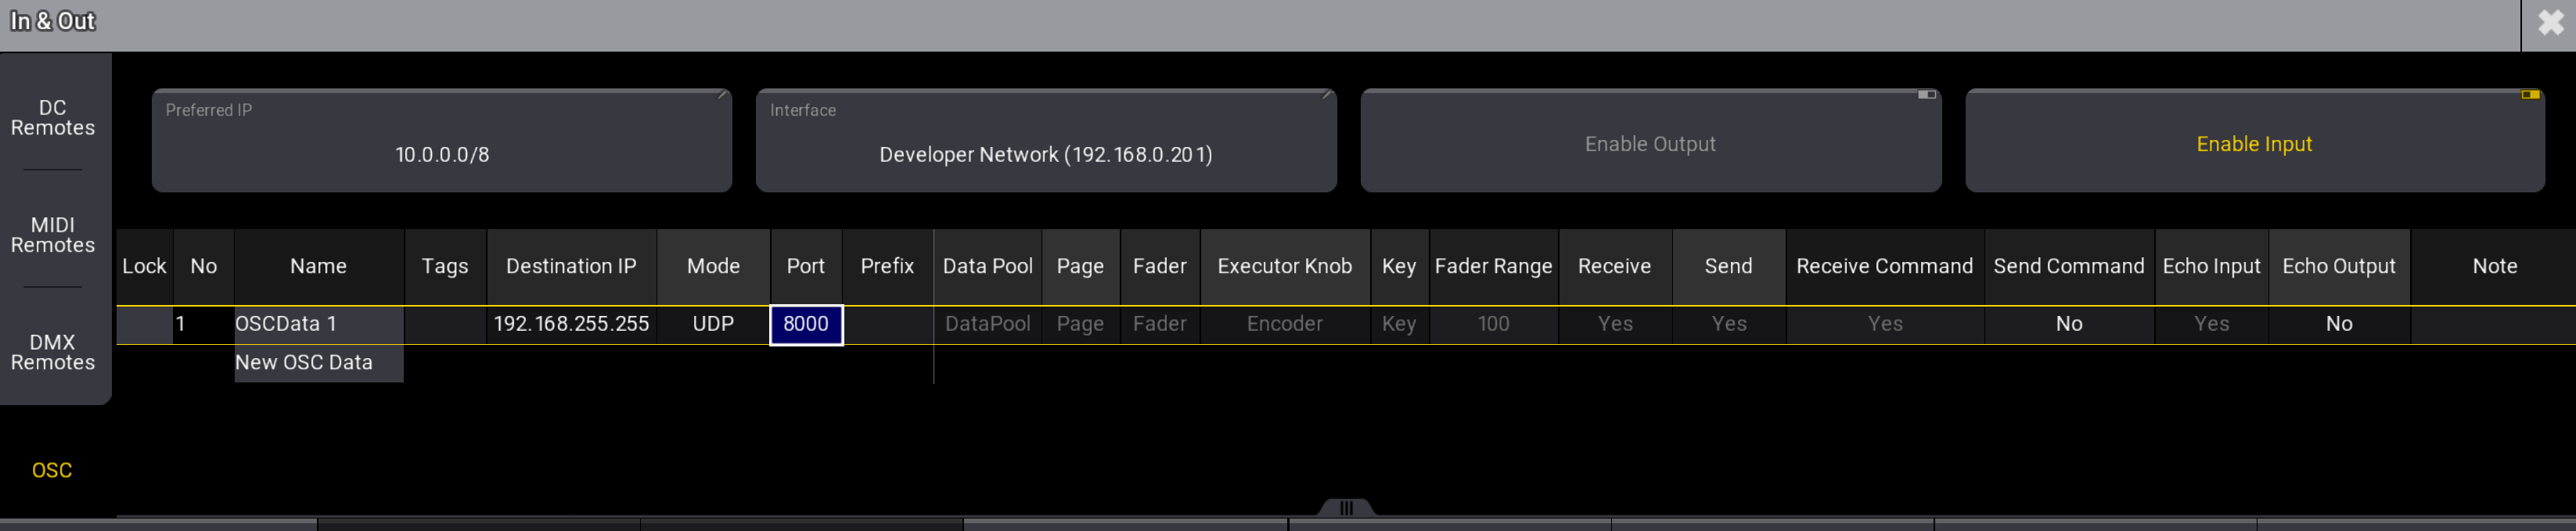 |
Make sure that the following settings are in place:
is active.
A OSC data line is present with UDP mode and a input port number. (e.g. 8000) Additionally, and are set to Yes. can be activated optionally, so that incoming OSC messages are visible in the System Monitor.
Option 1: Cue Trigger
This option triggers individual cues depending on an Actor's position. The cues are represented by a freely defined rectangle on the tracking area, which is divided into an arbitrary number of cells. Additionally, a cue can be triggered if the Actor moves outside of the defined rectangle.
On the zactrack App, switch to the Show Editor.
Open the tab.
Create 3 Calibration Points to define the rectangle in 3D space: Origin, x-axis endpoint and y-axis endpoint. Here is an example of 3 points defining a rectangle parallel to the X and Y axes.

Note
The usual orientation of the rectangle is within the XY plane. Depending on the type of tracking (2D/3D), the rectangle can also be defined non-parallel to the XY plane, i.e. in vertical orientation.
Open the tab.
Create a new Fixture Type by tapping the
 button.
In the dialog, switch to the tab and select .
Provide a meaningful name, scroll down the preset list and select .
Confirm by tapping .
The Fixture Type dialog already has most of the settings predefined. Define the remaining elements:
Target IP: address and port of the console. In case of a multi-console setup, add more targets as needed.
Argument(s): Per default, zactrack will trigger cue numbers defined by the grid (see below) in sequence 1. Change the sequence number as needed.
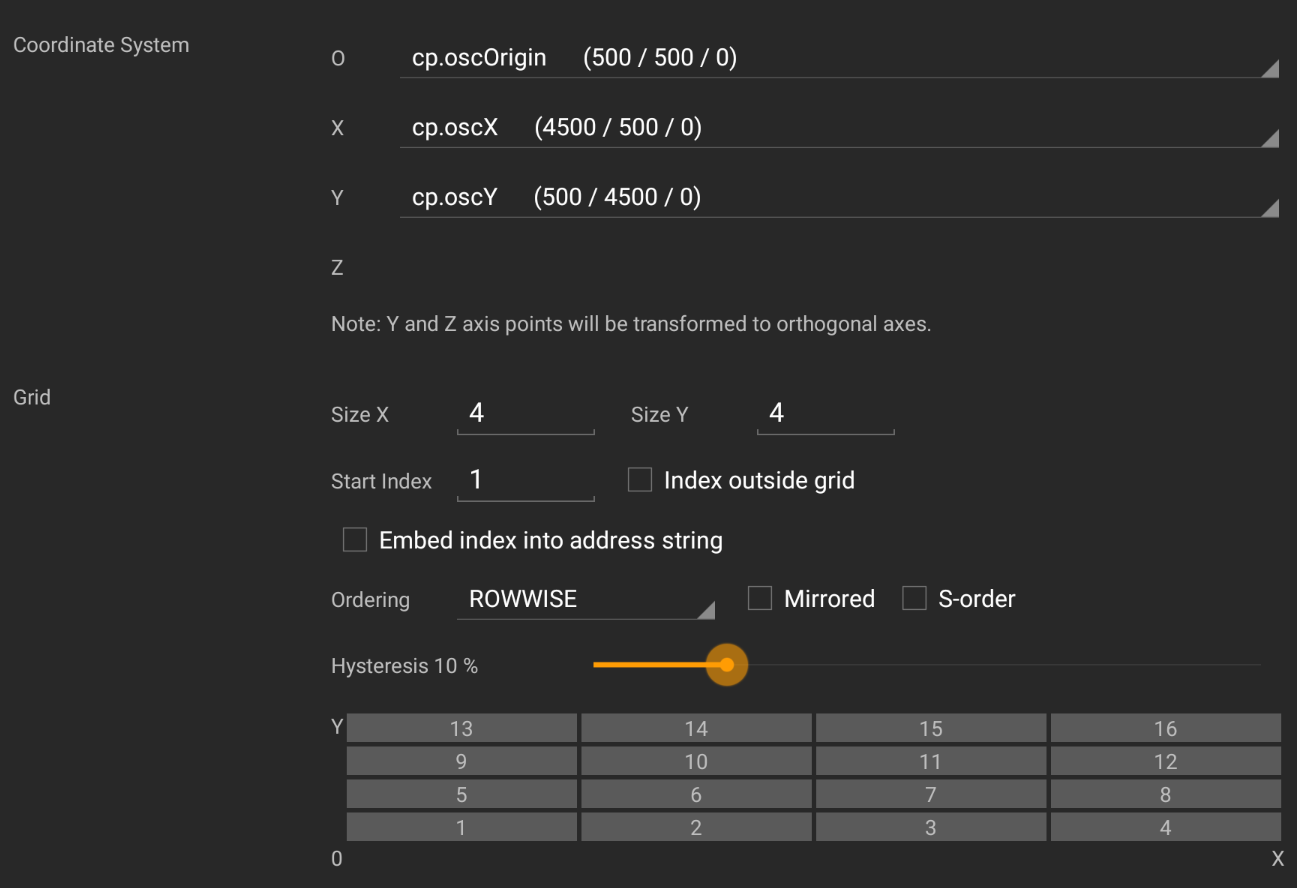
Coordinate System: Select the previously defined calibration points for origin, x-axis and y-axis. The point coordinates can be changed later if needed.
Grid: Define the size of the grid, the start index for the numbering and the order of the numbers within the grid. If a cue number shall be fired when the Actor leaves the rectangle, activate the checkbox and define a cue number. The grid and its cell numbers are visualized below. To prevent "flickering" when the Actor is located exactly between two neighboring cells, set a hysteresis value. A value of e.g. 10% means that the Actor has to pass 10% of a cell's width or height until the number of this cell is triggered.
When everything is set, tap .
Switch to the tab.
Create a new Fixture using the previously defined Fixture Type. Leave the standard settings unchanged and confirm by tapping .
The location of the OSC grid can be shown in the Live view. Switch to the tab and open the OSC Fixture's Live dialog.
Optionally, enable the checkbox and close the dialog. The view will now show the OSC grid being defined by the 3 Calibration Points.
Upload the showfile to the server.
Once everything is set up, assign an Actor to the OSC Fixture and observe the triggered cues on the grandMA3.
Note
In case of issues, use the I/O Monitoring to check whether zactrack is correctly sending out OSC messages. Check network settings on both sides and - in the case of running grandMA3 onPC on Windows - firewall settings allow receiving OSC data.
Option 2: Fader Control
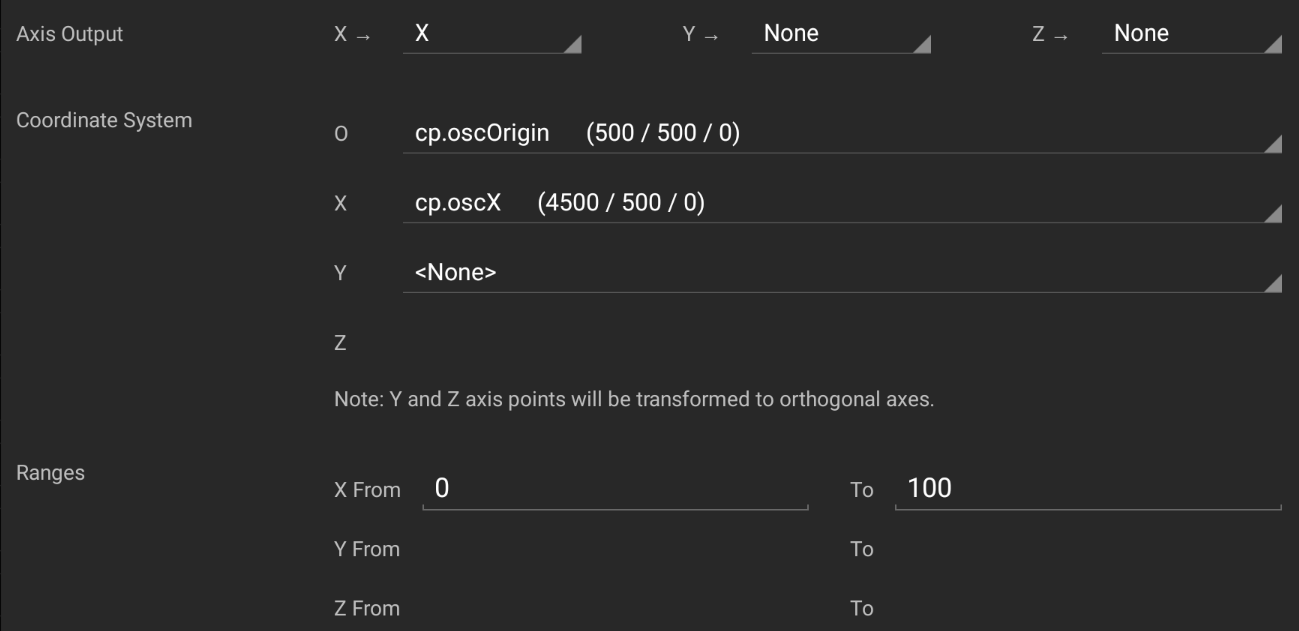
This option moves an executor fader depending on an Actor's position on a straight line with 2 endpoints. Depending on the Actor's projected position on the line, a value between 0 and 100 is sent. Surpassing the line's endpoints will retain the nearest value.
On the zactrack App, switch to the Show Editor.
Open the tab.
Create or reuse 2 Calibration Points to define the straight line in 3D space: Origin and x-axis endpoint.
Note
The usual orientation of the line is within the XY plane. Depending on the type of tracking (2D/3D), the line can also be defined non-parallel to the XY plane, i.e. in vertical orientation.
Open the tab.
Create a new Fixture Type by tapping the
button.In the dialog, switch to the tab and select .
Provide a meaningful name, scroll down the preset list and select .
Confirm by tapping .
The Fixture Type dialog already has most of the settings predefined. Define the remaining elements:
Target IP: address and port of the console. In case of a multi-console setup, add more targets as needed.
Argument(s): Per default, zactrack will move fader 101 on page 1. Change the numbers as needed.
Coordinate System: Select the previously defined calibration points for origin and x-axis. The point coordinates can be changed later if needed.
When everything is set, tap .
Switch to the tab.
Create a new Fixture using the previously defined Fixture Type. Leave the standard settings unchanged and confirm by tapping .
The location of the OSC grid can be shown in the Live view. Switch to the tab and open the OSC Fixture's Live dialog.
Optionally, enable the checkbox and close the dialog. The view will now show the OSC coordinate axes being defined by the 2 Calibration Points. Only the red x-axis is relevant.
Upload the showfile to the server.
Once everything is set up, assign an Actor to the OSC Fixture and observe the fader movement on the grandMA3.
Note
In case of issues, use the I/O Monitoring to check whether zactrack is correctly sending out OSC messages. Check network settings on both sides and - in the case of running grandMA3 onPC on Windows - firewall settings allow receiving OSC data.