Integrate
After having calibrated the tracking system, the next step is to integrate lighting fixtures
Define Universes for input and output.
Add a Fixture Type to the show.
Add and patch Fixtures to the show.
Align the Fixtures.
Patch zactrack Fixtures and Actors on the console.
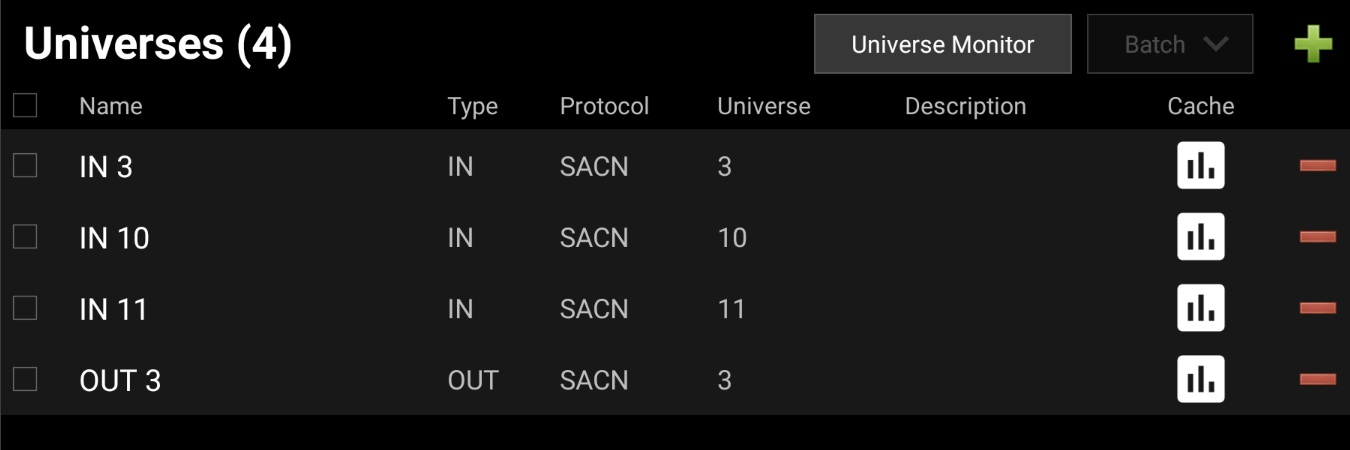
Define Universes
The zactrack server receives and sends DMX universes for fixture channel values as well as zactrack-specific functions. IN universes contain fixture channel data as well as zactrack-specific control data for Actors and Fixtures. OUT universes contain fixture channel data, which might be altered depending on the current operation mode (i.e. tracking, autofunctions), and sent out to a node or directly to a fixture. In the scope of this tutorial, sACN is used as the transport protocol for DMX data.
Refer to the universe and patching scheme in Preparations.
Switch to the via the top navigation bar.
Go to the tab and tap the
 button on the top right to add a new universe. This will open up a dialog.
Select for the type, for the protocol and 3 for the start universe. Leave the quantity at 1 and confirm by tapping . This will create an input universe listening to sACN data on universe number 3.
Repeat the steps 3 and 4 for input universes 10 and 11.
Create an output universe by performing step 3 and 4, but select the type, protocol, target, start universe 3 and set the priority to 200. Also, select for the In Merge option. This will copy all data from non-zactrack patched fixtures from the input universe to the output universe. Confirm with .
Upload the Show to the Server.
The Universes list in the Show Editor now lists 3 inputs and 1 output.
Tip
If the console is already connected and patched, the Universe Monitor can be used to check if data input is received.
 |
Add a Fixture Type
A Fixture Type contains all necessary attributes and physical definitions needed by zactrack in order to control actual fixture instances. zactrack comes with an internal library containing a broad set of available fixture models, which will be used in the scope of this tutorial. Fixture Types can also be imported fromGDTF or defined manually.
Switch to the via the top navigation bar.
Go to the tab and tap the
button on the top right to add a new fixture type. This will open up a dialog.Select the Prolights Astra Wash 7 Pix (Standard Mode). The list can be filtered by entering a term in the search field on top of the list.
Repeat the steps 3 and 4 for input universes 10 and 11.
Upload the Show to the Server.
The Fixture Types list in the Show Editor now lists 1 type.
 |
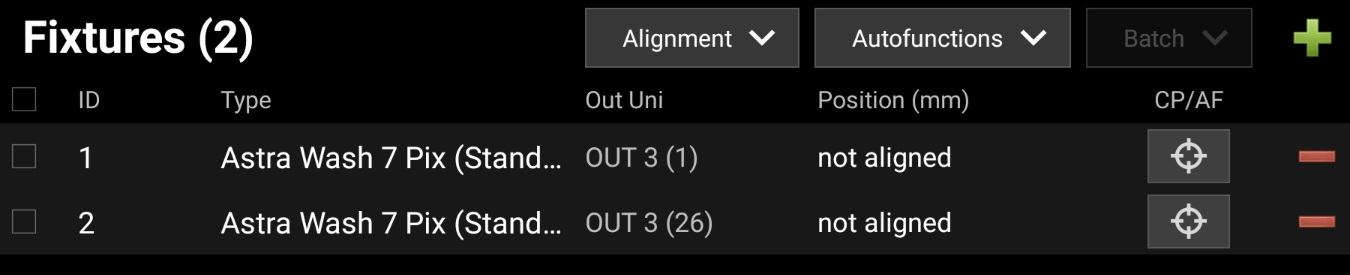
Add a Fixture
Fixtures are the actual device instances of Fixture Types and need to be patched. In this tutorial, we have 2 devices of the previously defined type.
Switch to the via the top navigation bar.
Go to the tab and tap the
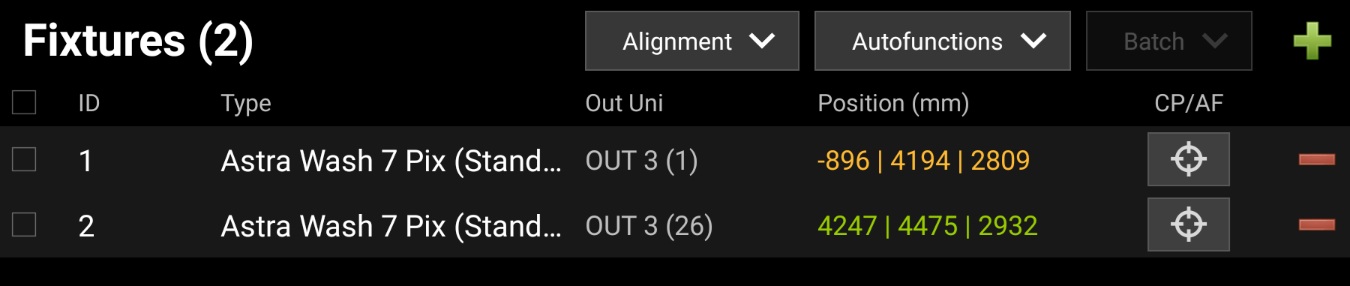
button on the top right to add new fixtures. This will open up a dialog.Select the Astra Wash 7 Pix (Standard) type, out universe with start address 1 and a quantity of 2. Leave all other options unchanged. Confirm with .
Upload the Show to the Server.
The Fixture list in the Show Editor now lists 2 fixtures patched on universe 3 with addresses 1 and 26.
 |
Note
Connectivity and correct patching can be tested by tapping a Fixture's  button. This will open the Alignment/Autofunctions dialog, which allows manual fixture control to verify the signal chain. If the fixture is not moving, check the Fixture patch, Universes, network settings, cabling and the Fixture's own configuration.
Fixture Alignment
In order to have Fixtures track follow the position of an Actor, zactrack needs to determine the exact location and orientation of the device. The process of measuring these parameters is called Alignment.
Switch to the via the top navigation bar.
Go to the tab and tap the button. Choose the from the submenu.
The Alignment Wizard dialog opens and asks for a selection of Fixtures to be aligned. Select both Fixtures and tap .
The Wizard offers some advanced options for alignment, which can be ignored.
If not still in place from the calibration procedure, put the first 4 Trackers inside the colored calibration disks and place them on the stage in a similar pattern as used for the calibration.
The Alignment Wizard tracks the connectivity status of the Trackers and shows once all 4 Trackers are in place. Tap to start the Alignment process.
In order to compute the position and orientation of a Fixture, at least 4 known positions have to be focused. The Wizard guides through the process and offers controls for pan/tilt as well as light output.
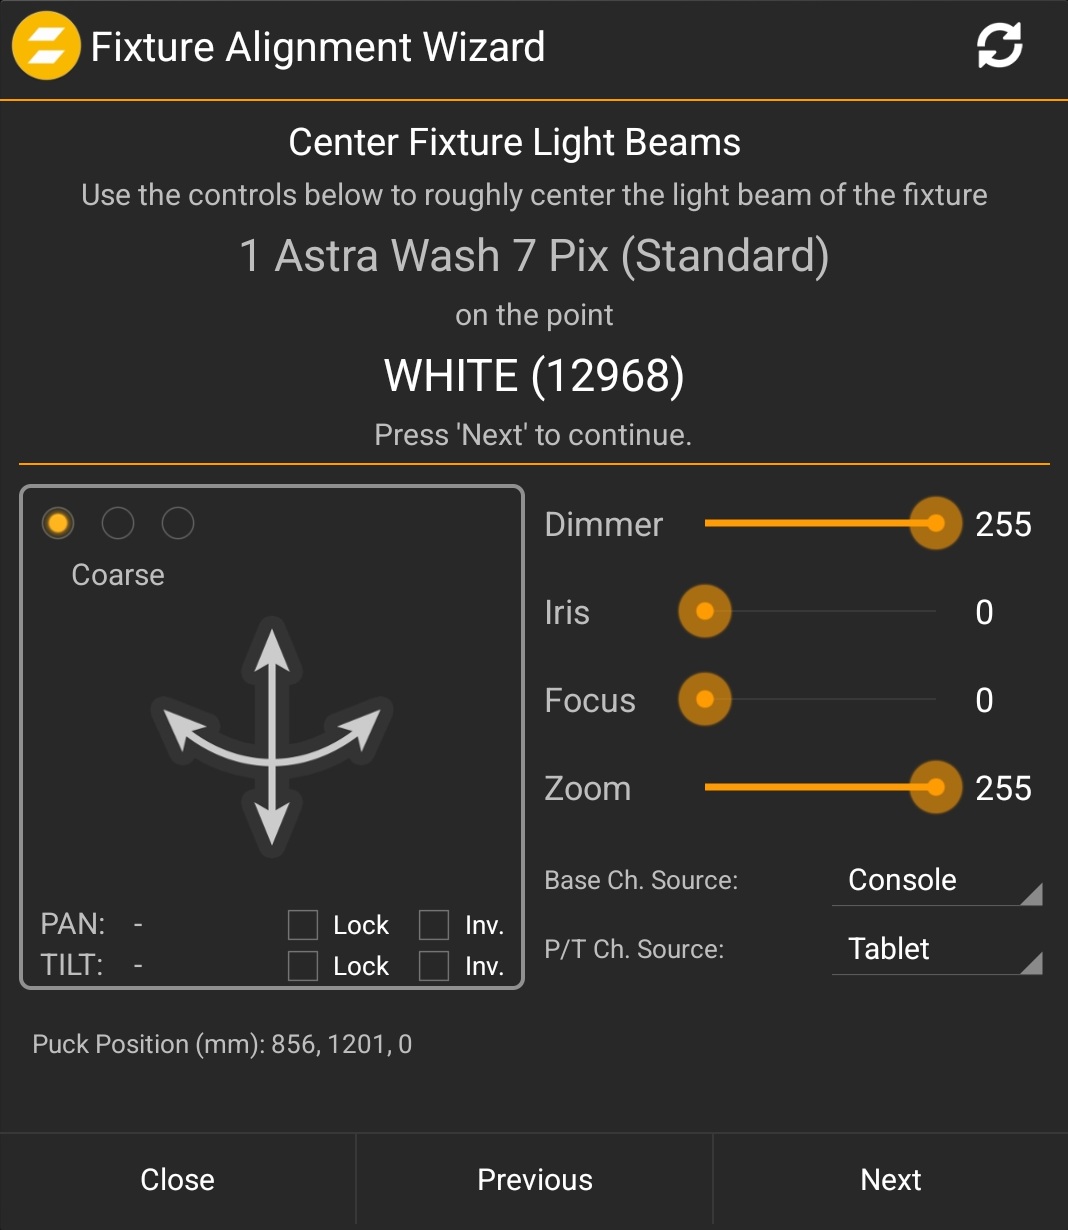
Enable light output of the fixture. Select for the Base Channel Source (or if a console is already patched and programmed for light output). Leave the P/T Channel Source on .
Ensure a narrow light output by adjusting the Dimmer/Iris/Focus/Zoom sliders, depending on the Fixture's capabilities.
Use the Pan/Tilt touch panel to focus the first Tracker in the white calibration disk. The touch panel offers multiple options to lock or invert individual movement axes as well as switching sensitivity from Coarse to Fine or Ultra-Fine.
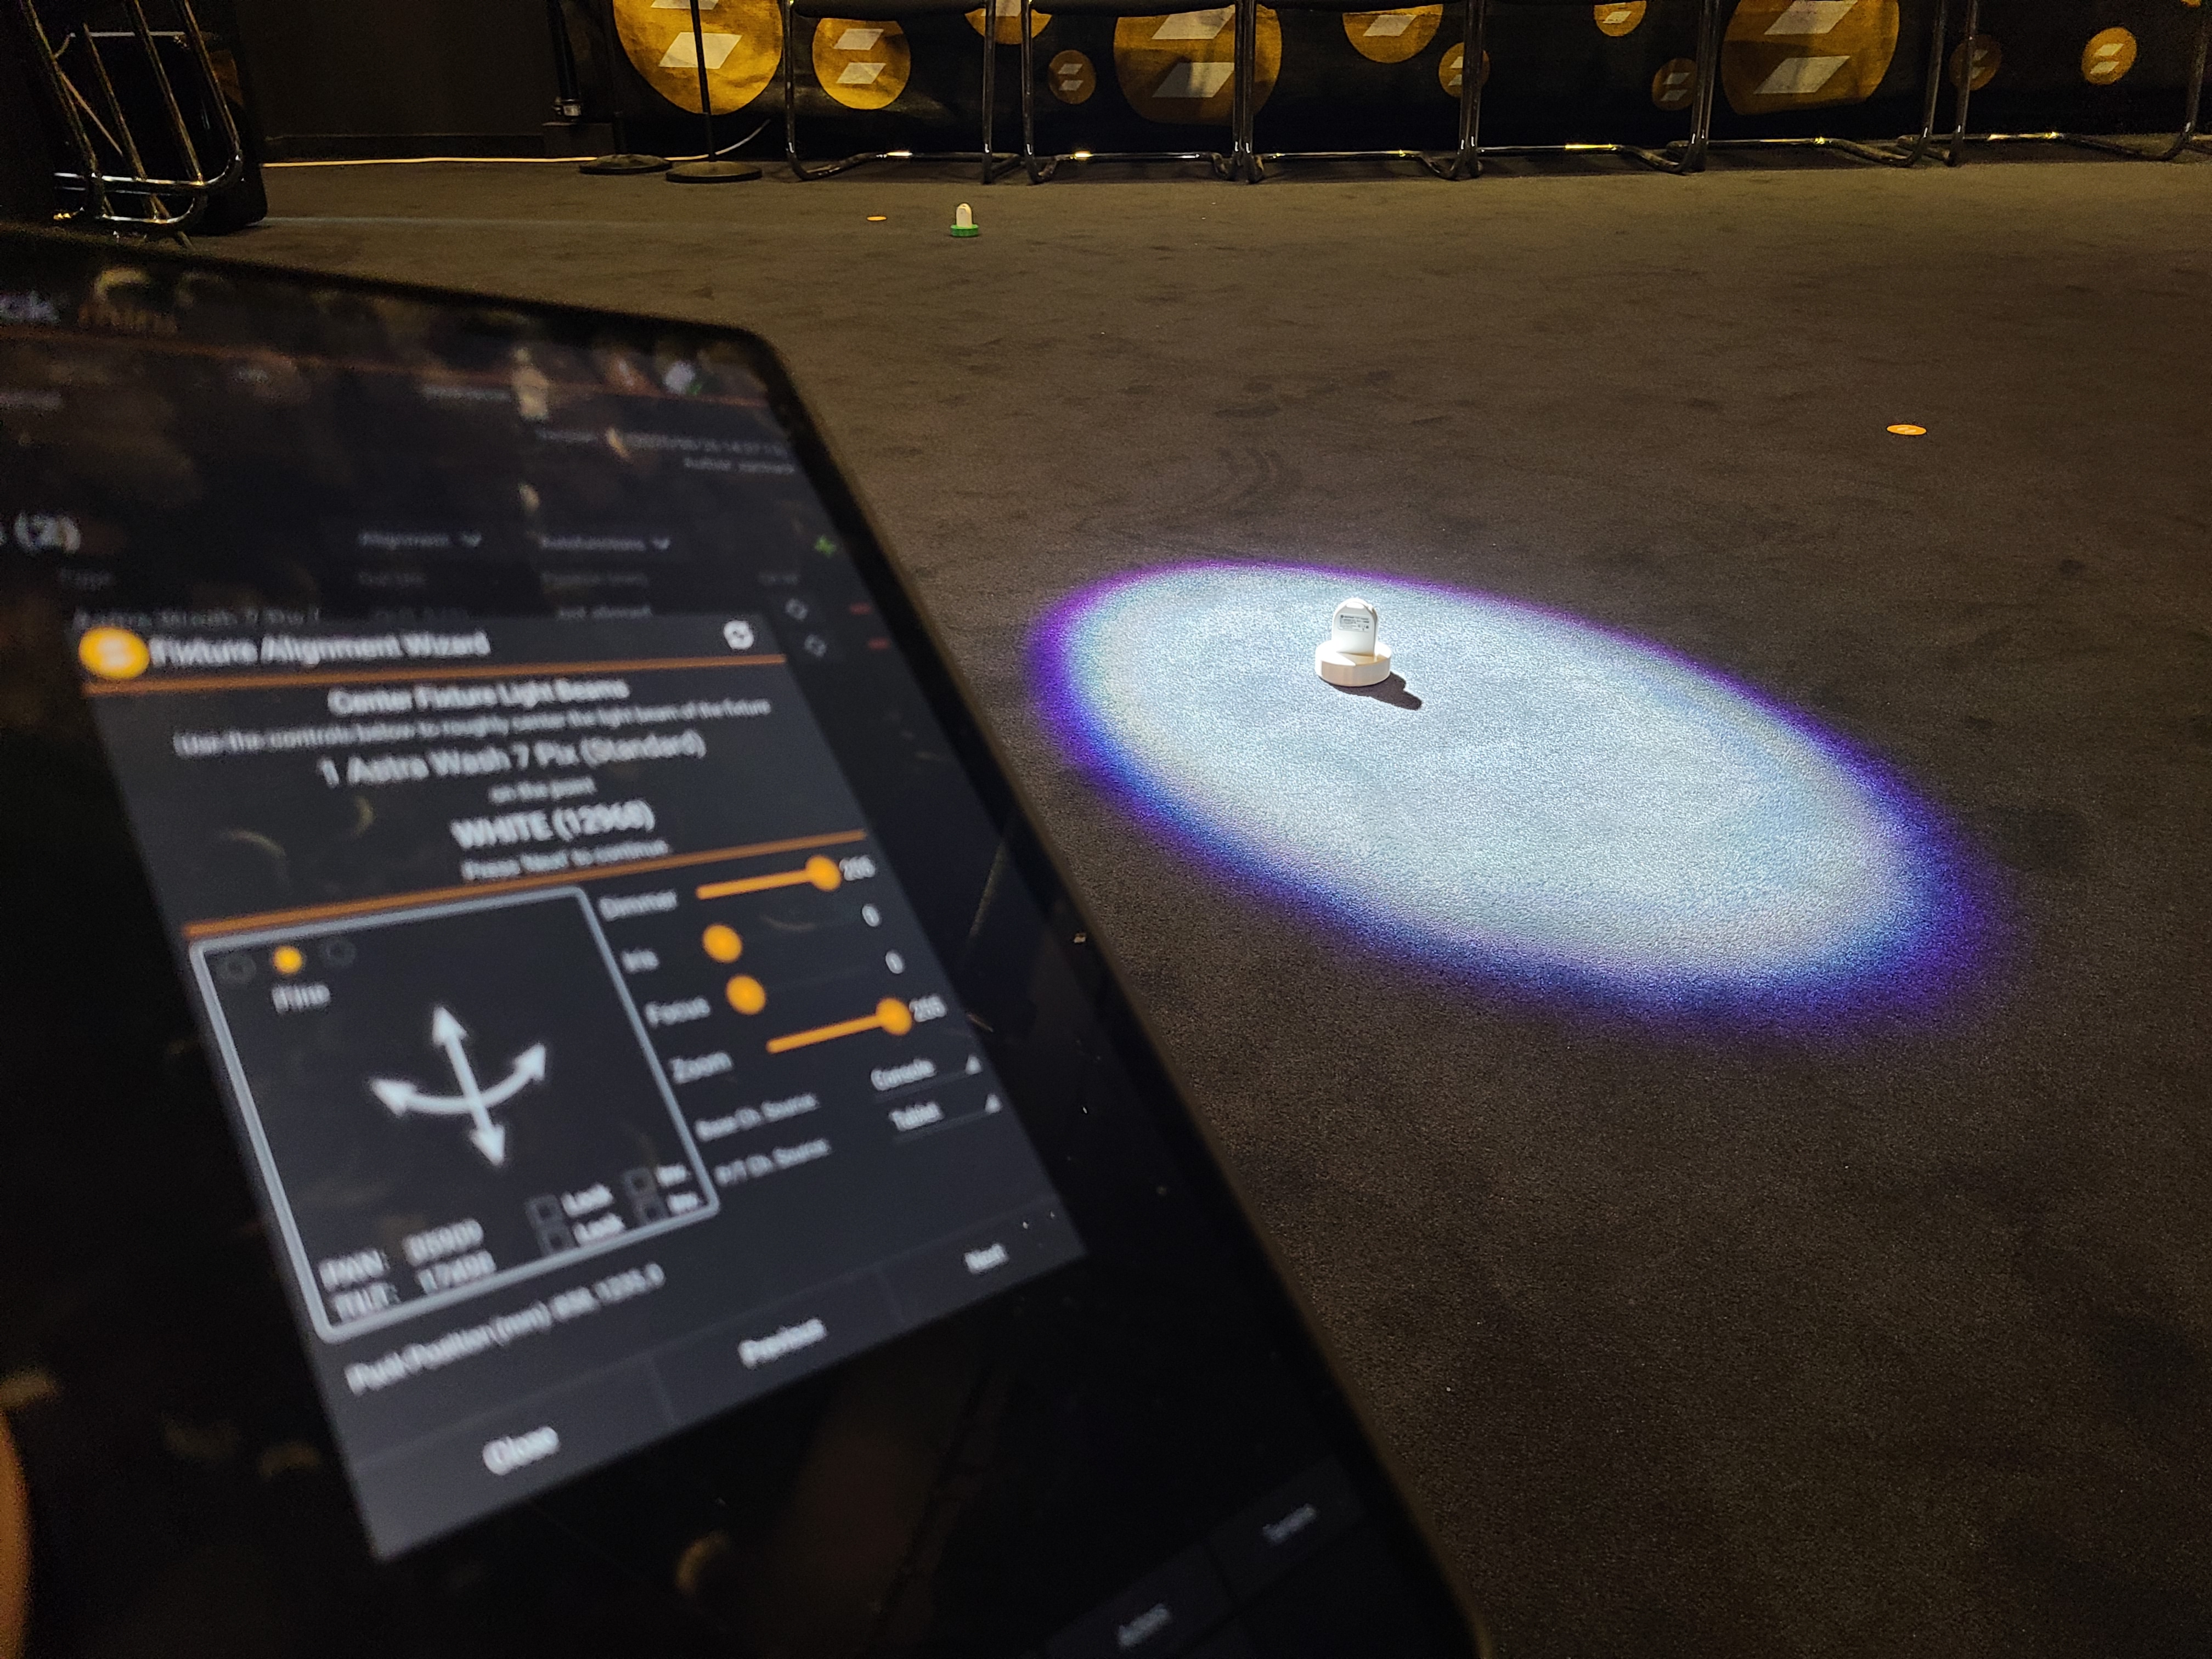
Once the first Tracker is focused (Tracker hit with beam center), tap .
Repeat steps 11 and 12 until both Fixtures have been focused on all 4 Trackers.
The Wizard then processes the stored position and pan/tilt values and compute the results, which will show up in the dialog. A colored checkmark next to the computer XYZ position indicates the quality of the alignment result.
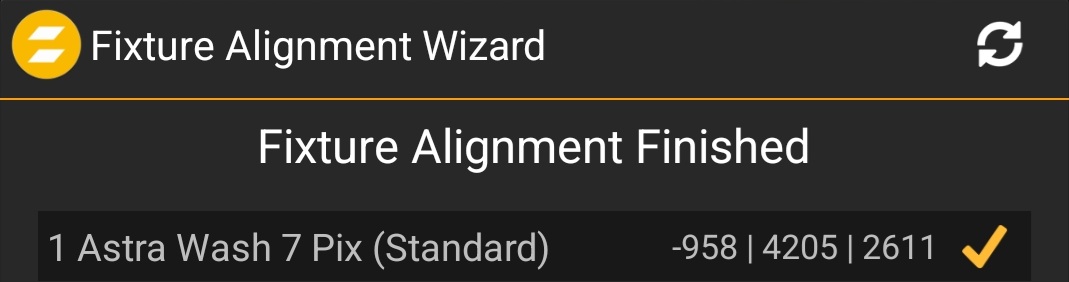
Upload the Show to the Server.
The coloring of the alignment result indicates how well the algorithm is able to compute a position, from which it is possible to focus the alignment positions using the manually defined pan/tilt values. More important is the visually perceived accuracy, which can be checked by tapping the
button next to the respective Fixture's computed position in the Show Editor. This will bring up the Alignment/Autofunctions dialog.In the dialog, switch to the tab. If aligned, the Fixture will automatically move to the origin (0/0/0) of the tracking coordinate system.
Use the XY touch panel and the Z slider to move the Fixture's target in XYZ space to verify the alignment result.
Tip
Enable the and the Y-axis checkbox and move the Fixture along the X axis to verify the alignment quality using a visual reference. The same can be done with an isolated Y-axis move.
The Fixture list in the Show Editor now lists the 2 fixtures with their computed position. The display color of the computed XYZ position is dependant on the alignment quality.
 |
Console Integration
A fundamental feature of zactrack is its capability to integrate with any existing control equipment, so that the operator still has the full control over the show and coordinate all zactrack functions from the desk.
Note
Controlling Fixtures and assign them to Actors for tracking is also possible via the zactrack UI without the necessity of a console. For small setups or demonstrations, this step can be skipped.
Integration of all elements takes 3 steps:
Set the zactrack control modes.
Patching Fixtures' input and control universes.
Patching Actors' control universes.
Patching on the console.
The first step is the definition of the control modes. Actors, Fixtures and the Show have different control modes. These are show-specific settings and must by in sync with the console patching.
Open the
 menu and select . This will bring up the Show Settings dialog.
In the section , select the respective control modes. For the scope of this tutorial, Actors will be controlled in the Extended mode, while Fixtures and the Show will be controlled in the Standard mode. Select the respective modes.
Although not part of this tutorial, the Show itself (Autofunctions scenes and Terrains) can be controlled from the console as well. Enable the checkbox, select the Control Protocol and the Universe with an address of 501.

Upload the Show to the Server.
The second step is to complete the Fixture patching:
Switch to the via the top navigation bar.
Go to the tab and tap on the first Fixture's name in the list. This will bring up the Fixture Detail dialog.
Refer to the Preparations section for the patching details. The 2 Fixtures are patched on Universe 3 for both input from the console and output to the nodes. Select for the In Universe.
Control channels for the zactrack-related functions of the Fixture are patched on Universe 10. Enable the checkbox, select the Control Protocol and for the Control Universe with an address of 23. Tap to save the changes.
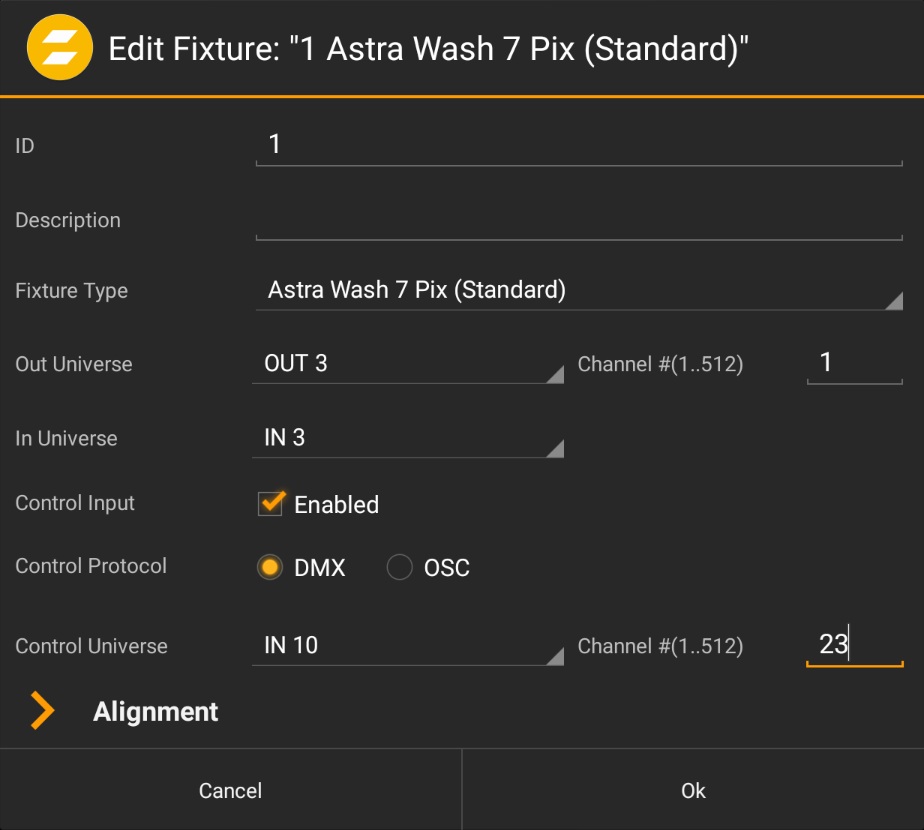
Perform step 4 for the other Fixture and change the values according to the patch.
Upload the Show to the Server.
Switch to the tab.
On the right side, switch to the tab and tap the list entry. This will bring up the Live Settings dialog.
Select for the Base Channel Values at the bottom of the dialog an uncheck all checkboxes to give full control to the console. Tap .
The third step is the patching of the zactrack Actors. The Batch Edit feature comes in handy for this step.
Switch to the via the top navigation bar.
Go to the tab and select all checkboxes in the list.
Tap and select from the dropdown menu. This will bring up the Edit dialog.
Refer to the Preparations section for the patching details. Select for the Control Protocol, for the Control Universe and enable the checkbox with an address of 1.
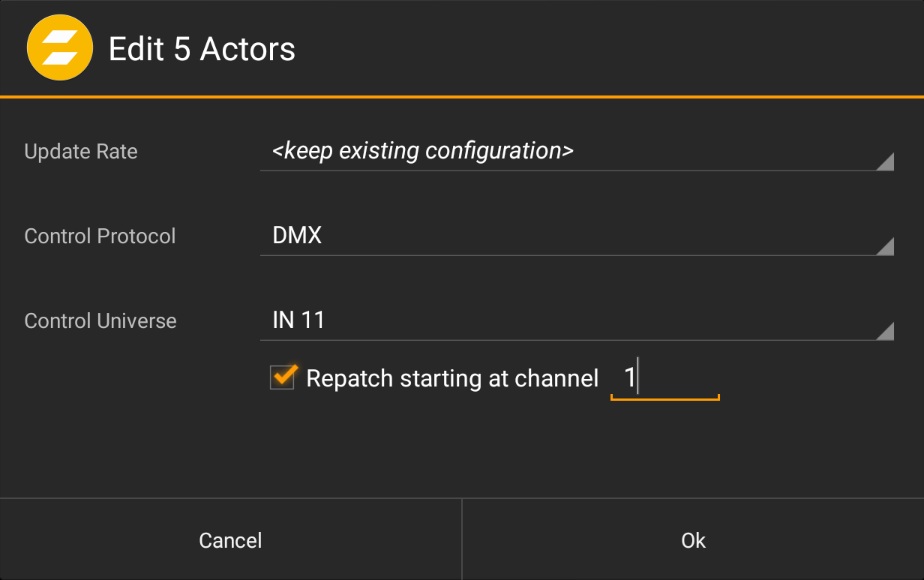
Tap to save the changes and close the dialog.
Upload the Show to the Server.
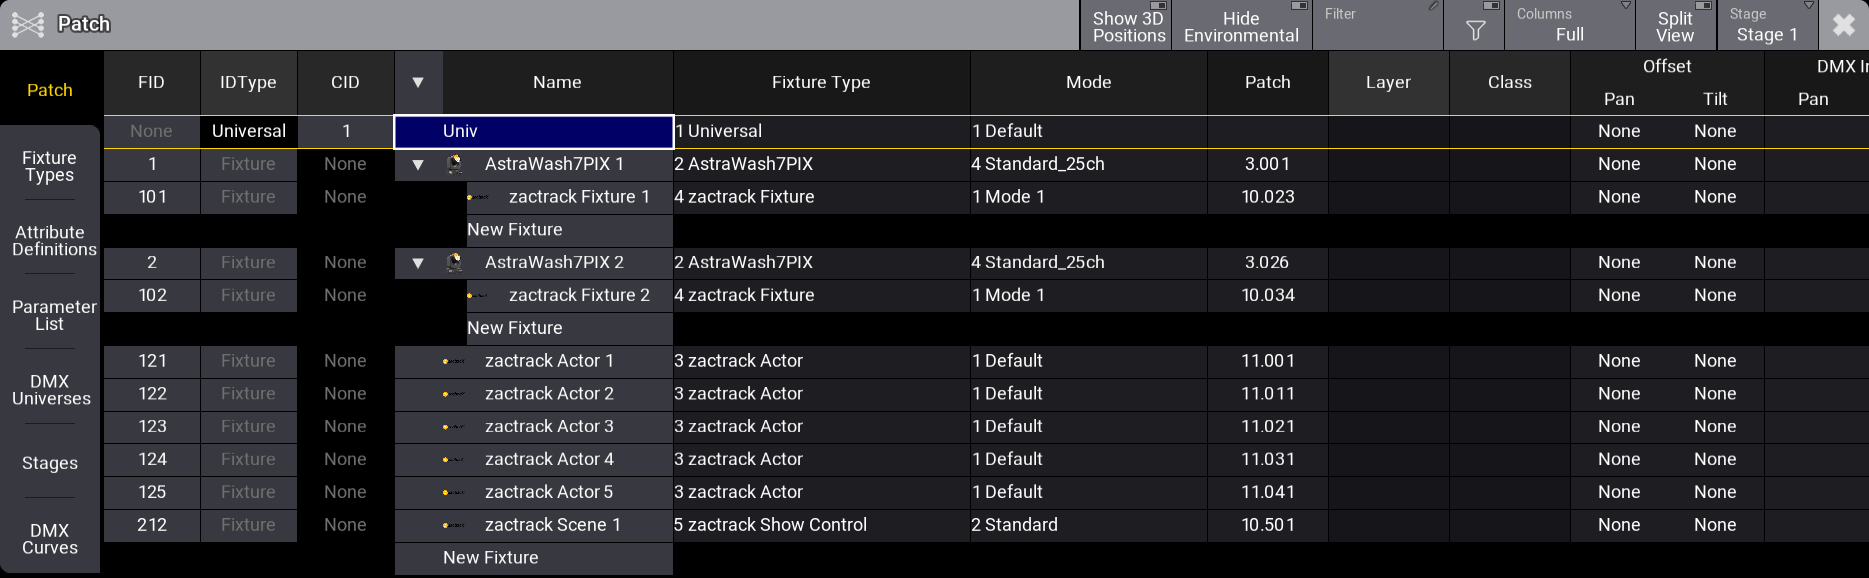
The patching on zactrack side is complete and needs to be reflected on the console. In the scope of this tutorial, a grandMA3 is used for control. The steps to create the patch are not part of this tutorial, the result is shown below. For convenient operation, it makes sense to patch the zactrack controls for a Fixture as a sub-patch.
 |
Note
DMX definitions for all zactrack functions can be downloaded from gdtf-share.com database, which is directly accessible from the grandMA3 user interface. The most recent revision is 3.18. The definitions can also be created manually by following the zactrack DMX Sheet, which can be downloaded from zactrack.com/downloads.
Next: Track