Preparations
Before setting up the show, define and choose the components
Choose the zactrack system type.
Choose between MINI, SMART and PRO. The product website provides a side-by-side comparison: https://www.zactrack.com/product-comparison
The MINI system is chosen for this tutorial.
Define the network and signal flow.
With the exception of the MINI system, which provides a DMX port, all setups require networking infrastructure. This includes lighting or audio consoles, DMX nodes, media servers and audio processing units. Zactrack allows multiple ways of connecting to other systems.
Install the app.
An Android tablet with the zactrack app is required for setup.
1 Choose the zactrack system type
There are 3 zactrack system types available to choose from, depending on the requirements:
Venue Size
MINI is suitable for areas of approx. 15x15 meters (50x50 feet) size, SMART covers approx 30x30 meters (100x100 feet), and PRO can operate in stadium-sized venues.
2D or 3D
SMART and PRO systems allow full 3D tracking, MINI outputs 2D tracking with the option for pre-defined terrains ("2.5D").
Number of Actors to be tracked
How many targets need to be tracked on the stage simultaneously? How many targets need to be kept ready ("inactive") at the same time?
Output Type
Zactrack can calculate positions with both high and low update rates simultaneously. Lighting and video output requires a higher update rate of 14Hz or more, audio usually only requires 8Hz or less. This requirement relates to the number of targets to be tracked at the same time. The system can operate more low-rate devices simultaneously than high-rate devices.
Numer of outputs
MINI can provide active output for 32 devices, SMART allows 64 (or 256 with a backup server), and PRO supports a virtually unlimited number of outputs.
Backup Functionality
SMART and PRO systems offer the ability to incorporate a backup server for added reliability.
For this tutorial, zactrack MINI will be used to track a small area with 2 moving lights.
2 Define the network and signal flow
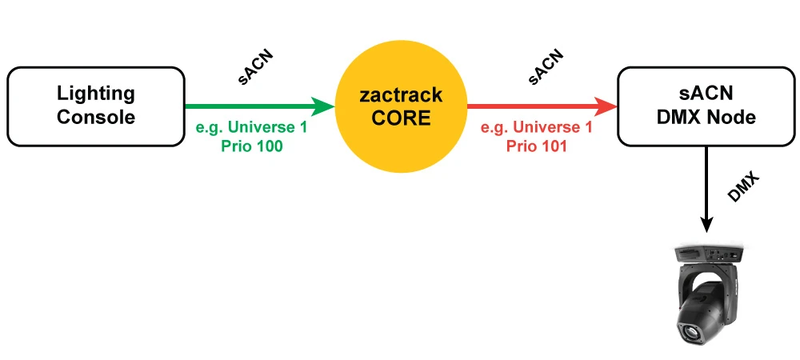
In this tutorial, a grandMA3 console is used to control 2 Astra Wash fixtures via sACN output. The console multicasts some universes, which are also received by zactrack. The universes, on which the 2 fixtures are patched, are sent out by zactrack with a higher priority. This allows to have the full control from the console even if zactrack is not present.
 |
Network Setup
Device | IP |
|---|---|
grandMA3 Console | 192.168.0.40/24 |
zactrack MINI Server | 192.168.0.200/24 (custom IP) 172.20.33.101/16 (fixed IP) |
Signal Distribution
Universe | sACN Priority | Signal Flow | Usage |
|---|---|---|---|
3 | 100 | Console -> zactrack (and Console -> Node) | Fixture Channels |
3 | 200 | zactrack -> Node | Modified Fixture Channels |
10 | 100 | Console -> zactrack | zactrack Fixture and Show Control |
11 | 100 | Console -> zactrack | zactrack Actor Control |
DMX Patching
Fixture | Patch |
|---|---|
1 AstraWash 7 Pix 25ch | 3.001 |
101 zactrack Fixture | 10.023 |
2 AstraWash 7 Pix 25ch | 3.026 |
102 zactrack Fixture | 10.034 |
121 zactrack Actor 1 | 11.001 |
... | ... |
125 zactrack Actor 5 | 11.041 |
212 zactrack Show | 10.501 |
Note
These definitions are needed for the integration step later on.
Check and prepare the zactrack system
Make sure that all system components are ready and operating:
Charge the Master Anchor, the wireless Anchors and the trackers using the charging bay.
Charge and prepare an Android tablet running the zactrack App. The installation process for the app is described below.
Label the Anchors with numbers for easier identification.
Check that the contents of the MINI kit are complete:
1 Master Anchor
5 wireless Anchors
5 Trackers in the charging bay
4 colored calibration disks
6 mini-tripods
1 Android Tablet
7 USB-C chargers
App Installation
If the app is not yet installed on the Android tablet, follow these steps:
Switch on the Master Anchor (which also is the server) and wait for it to boot. The front LED will blink in a blue color once the server is ready.
Take the tablet and connect to the server's WiFi hotspot. If not changed prior, the SSID and password are printed on the label on the backside of the server.
Tip
In case the WIFI settings were changed and got lost, the server is always accessible via ethernet on its 172.20.x.x IP address printed on the backside label. This requires e.g. a laptop to be set to a compatible IP and connected to the LAN.
Open a web browser and enter the 172.20.x.x IP printed on the label on the backside of the server.
On the server landing page, select Tablet Applications.
Select Download zactrack 3 to download the APK file.
Install the APK on the Android tablet. It might be necessary to adjust the Android system settings in order to allow third-party applications to be installed.
Once the app is installed, it is ready to use.
The Autofunctions app can also be downloaded from the server and installed using the same process.
Next: Mount