User Management
User Management allows streamlining collaboration and control within the Web Monitor. Users can be created and given different roles, therefore providing access control to the system's Web Monitor functionality.
Note
If not logged in with any other user account, the Web Monitor is accessed by the guest user account. Per default (and after a factory reset), this account has full access to all features from Live View and Diagnostics in order to maintain compatibility. The guest user's rights can be changed by an administrator if default access shall be limited.
User Roles
Users can have one of 3 different roles:
Users have full access to all Web Monitor features from Live View and Diagnostics
Administrators can use the same features as Users, additionally they have access to the user management
Custom roles can be configured to provide access only to a selected set of features
Access to the following features can be granted or denied:
Live View
Visualizer, Proxy, Playback, Recording, Live Controls Read-Access, Live Controls Write-Access. Visualizer is required to be granted for all others.
Diagnostics
Anchor Link, Tracker Link, Analyzer, Recording, PDF Report, System Report, Info, I/O Monitoring.
Maintenance
System Info, Advanced Maintenance, System Update.
Apps
Tablet Applications Download.
User Management
User Management Dashboard.
Accessing the Dashboard
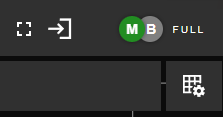
Creation, modification and deletion of user accounts is managed via the dashboard, which is accessible from the Web Monitor, using the  button next to the Main/Backup indicator.
Login with an administrator account to access the dashboard.
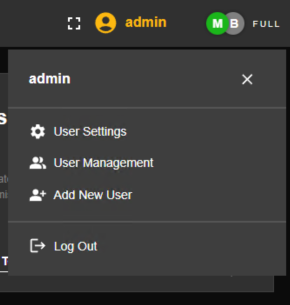
After successful login, the name of the currently logged in user will show up on the top right corner. Clicking on it will reveal a menu with multiple options:
User Settings opens a dialog for making changes to the current user account, e.g. changing the password.
User Management opens the User Management Dashboard for managing all user accounts
Add New User opens a dialog for creating a new user account and assigning a role to it
Log Out logs out the current user
 |
Note
The default administrator account has the username admin and the password admin. Go to the user settings and change the password after first login.
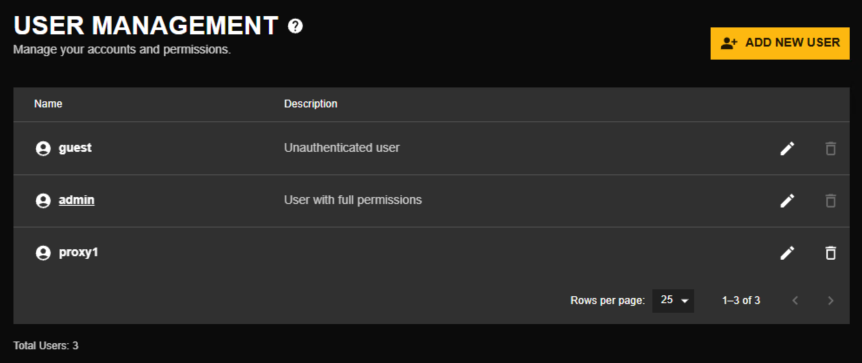
Selecting User Management brings up the User Management Dashboard, which lists all users. The dashboard allows creation, modification and deletion of user accounts. The guest and admin accounts are fixed and cannot be removed.
 |
Create a New User
Login with an administrator account and open the drop-down menu by clicking on the username.
Select Add New User from the menu.
Alternatively, open the User Management Dashboard and click Add New User there.
Define a username, password, role and - if applicable - custom permissions.
Tap Add New User to create the account.
Edit a User
Login with an administrator account and open the drop-down menu by clicking on the username.
Open the User Management Dashboard.
Locate the user in the list and tap the
 icon.
icon.Edit the user details and confirm the changes.
Delete a User
Login with an administrator account and open the drop-down menu by clicking on the username.
Open the User Management Dashboard.
Locate the user in the list and tap the
 icon.
icon.Confirm the deletion in the dialog.
Factory Reset
Resetting the user management database will delete all user accounts and re-create the standard admin account with the default password admin. This functionality is only accessible from the zactrack App in the Advanced System Settings. Use the factory reset if you want to remove all users or in case of loss of the admin access credentials.
Open the menu and tap System Settings.
Tap Advanced ... to open the advanced system settings panel.
Tap Factory Reset.
Select Reset Web User Credentials.
Tap Ok.
This will delete all users except for the default guest and admin account, which will get the default password again.