Live Control
All zactrack-related live parameters for Actors, Fixtures and the Show are usually controlled via the lighting desk or a controller sending OSC commands. Alternatively, these parameters can be modified via the tablet app or the Web Monitor. The parameters to be controlled are described in detail in the Live Tab section of the zactrack App.
Note
Changing Live Controls in the Web Monitor requires special user permissions, which can be configured via User Management. Guest users only have read access per default.
Accessing the Live Controls
The panel can be displayed on the main area in multiple ways and usually is minimized in order to free up screen estate for the visualizer.
Click on the title on the minimized panel on the bottom of the visualizer. This will bring up the panel.

In the expanded panels, the name of the currently controlled item is displayed. Clicking on it will display a dialog for selecting the item to be controlled.
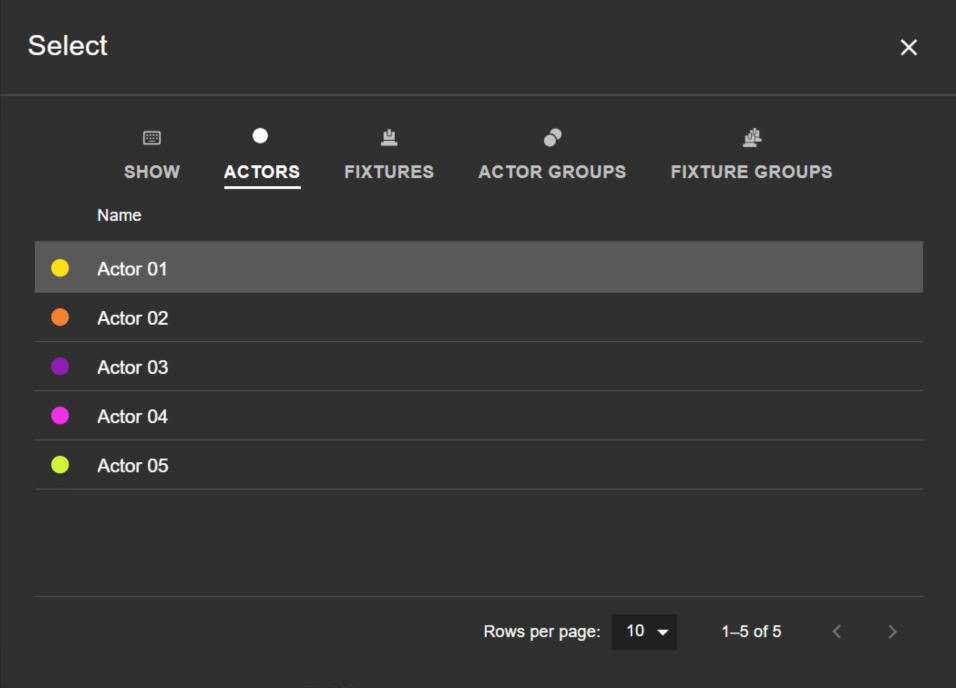
Select the desired item type from the icon buttons in the top row and the actual item from the list below. The controls will switch to the selected item.
Direct Actor/Fixture access
The live control panel can also be opened directly from a selection of an Actor or a Fixture.
Click on an Actor or a Fixture in the Actors/Fixtures list next to the visualizer. This will expand the detail view for the selected item.
Click on the
 icon in the bottom right corner of the detail view. The Live Control panel for the selected item will show up.
Assigning Fixtures to Actors
In contrast to Fixtures and Show, the live control panel for Actors displays either information or assigned Fixtures. The view can be switched using the icons  for showing information and
  for showing the assignment list.
Open the live control panel for the Actor to which a Fixture shall be assigned.
Switch to the list of assigned Fixtures using the
button.Click on the button on the top right of the list and select one or multiple available Fixtures.
Click to assign the selected Fixtures to the Actor.
Fixtures can be deassigned using the button on the right side of the Fixture name in the assignment list.
Changing Live Parameters
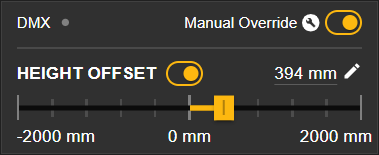
Each live control parameter is represented by a card in the live control panel and consists of multiple elements:
An input indicator defining the remote input for the parameter. This can be DMX, OSC or N/A (no control input). The indicator turns green when active input is present. Hovering over the indicator displays information on the current source.
A Manual Override switch for activating manual control of the parameter. Activating the switch is indicated by the yellow accent color and enables all control elements.
The Parameter Name and - depending on the type of parameter - a switch to enable or disable the parameter, e.g. for the Actor height offset.
Parameters can be controlled in multiple ways: one or multiple sliders, dropdowns for multiple values or buttons for presets. Slider values can also be entered numerically by clicking the
 icon.
icon.
Open the live control panel for the item that shall be controlled.
Each live parameter is represented by a card in the control panel. In order to control it manually, the switch has to be activated by clicking on it.
The controls in the parameter card can now be modified.
Disabling the button deactivates the respective controls, which will update their status according what is currently set in the system, e.g. the control desk.
Set to External Source
Live control input can be assigned to the external source (if present).
On the Live Control panel, click on the
 icon in the top right corner.
Select the option and confirm the dialog. This will assign all live parameters of the currently selected Actor/Fixture/Show to the external input (DMX or OSC).
Alternatively, click and select the desired entity from the dialog. After confirmation, the entity's live parameters will be assigned to the external input.
Changing the panel layout
The panel can be displayed in multiple ways in order to efficiently make use of the available screen estate. The layout can be switched via the icons on the right side of the panel's title bar.
 puts the panel to the bottom half of the main view, below the visualizer.
 puts the panel to the right side of the visualizer.
 maximizes the panel to fully take up space in the main view.