Preparations
Before a system can be set up there are some basic preparations that need to be done.
See Network for more Information
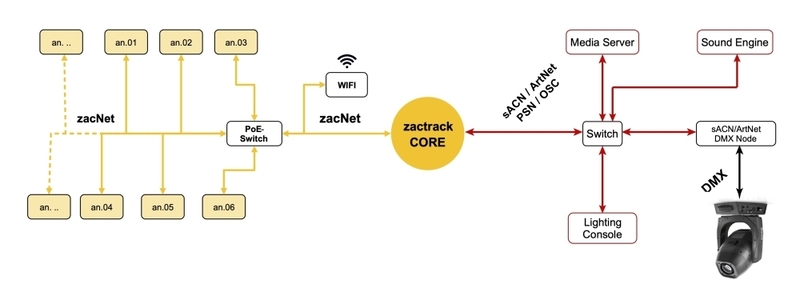
Basic connection diagram.
 |
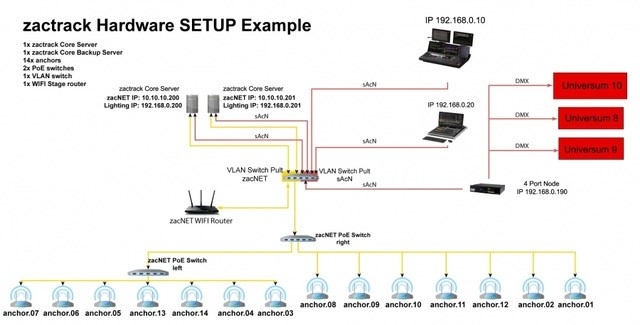
zactrack Hardware Setup Example
 |
In order to use a zactrack system, it is necessary to have a WIFI connection to the server.
See Wireless Networks for more information.
Tip
It is also possible to use a wired connection between Server and Android emulator or device.
To set up a zactrack system use the zactrack App.
Connect the Server with power and the ZacNET with your Network Environment see Network for more information
Go to the Server IP address in any browser on a Android tablet or an Android Emulator
Note
It will take you to this landing page. If it doesn't take you there then there is a connection issue between the server and your device.
Go to Tablet Applications
Click on the zactrack App to download it
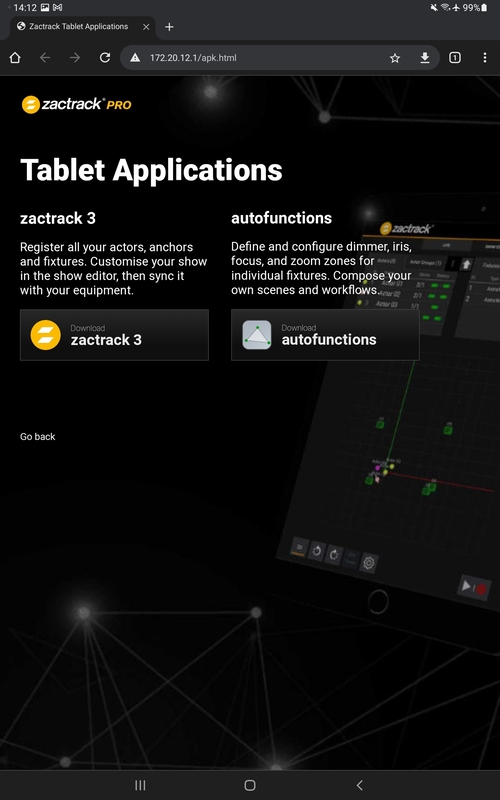
Install the App
Note
It is possible that your system shows a warning message. You can ignore this message.
Open the App
After opening the app there is no connection to the server
 |
Open the Server Connection window by clicking on the unplug icon.
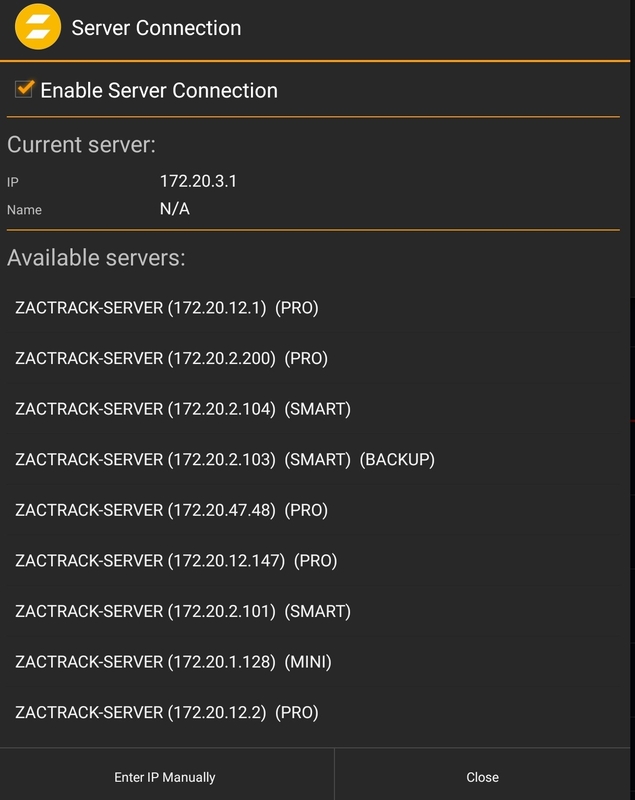
The Server Connection window will open and it will show all available servers in the network.
Note
The network setup and Gateway settings need to be set correctly for a system to automatically populate a server. It is possible that no server is showed in the list.
If your server doesn't automatically populate, it is possible to enter the IP Address manually.
Click Enter IP Manually
Type in the IP Address of the port on your zactrack server you are connecting to
After the succesfull connetion the toolbar looks different

The Toolbar shows a lot of different information.
Current System PRO / SMART / MINI
Syncronication between Server and Client Show Upload / Download
Current Connection Main / Backup Server Connection
Current license and Backup Status Server States
Menu Button Menu
The zactrack System can used in different areas:
Lighting
Sound
Video
Automation
Note
In order to use zactrack with lighting, it is necessary to set up your Lighting desk and do a Fixture Alignment
Tip
zactrack can be controlled thru DMX (sACN, ArtNET) or OSC (Input Commands) or in the Live section of the application
The zactrack App is for the setup and a simple way to control a zactrack system. During a show all control is on your lighting desk. It is not necessary to use a special lighting console. To control a fixture thru a lighting desk, it is necessary to add some virtual channels. This tell the system the bahivour of the fixture.
It is not necessary to specify only lighting fixtures for tracking, they can used as normal effect lights and in certain cues for tracking.
There are 3 different setups to connect the zactrack system to the lighting system.
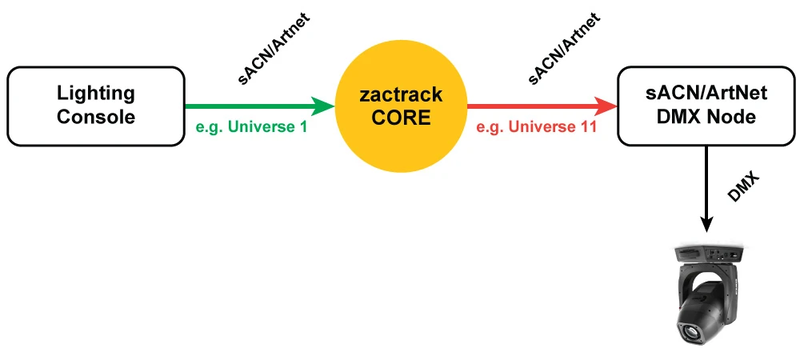
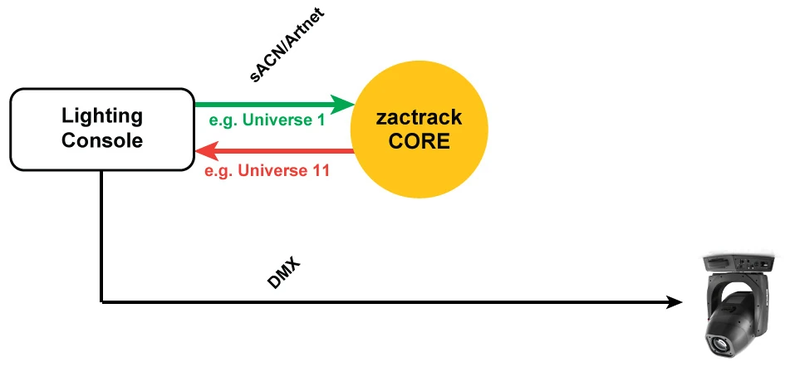
Universe Shift
The lighting desk sends e.g. Universe 1 over sACN or ArtNet → zactrack receives this Universe, manipulates the DMX channels according to the positions of the Actors and outputs the data on a new universe e.g. Universe 11 directly to the sACN / ArtNET DMX node.
Universe Merge
The lighting desk sends e.g. Universe 1 Prio 100 over sACN → zactrack receives this Universe, manipulates the DMX channels according to the positions of the Actors and outputs the data on the same universe e.g. Universe 1 Prio 101. The sACN / DMX node should always listen to the highest priority.
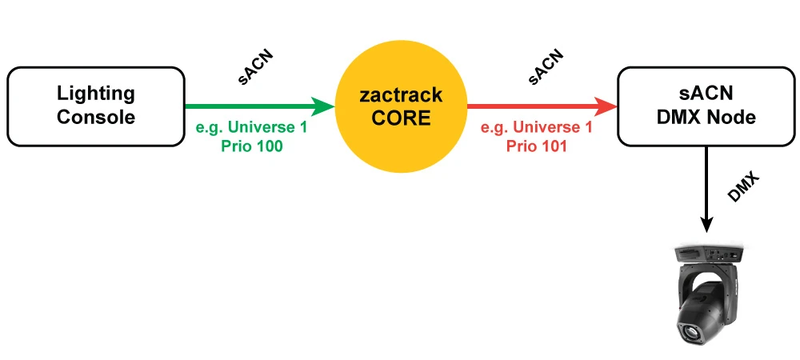
Note
zactrack doesn't listen to its own universe output to prevent a sACN loop.
Universe Console Merge
The lighting desk sends e.g. Universe 1 over sACN or ArtNet → zactrack receives this Universe, manipulates the DMX channels according to the positions of the Actors and outputs the data on a new universe e.g. Universe 11 back to the lighting desk.
Tip
In case of e.g. a MA system to output DMX via NPUs.
It is possible to control all or only certain Actors and Fixtures via OSC command.
See Open Sound Control for more information.
All zactrack systems are able to set up manually with a Laser Measurement device.
Tip
To improve the tracking accuracy and for fixed installations we recommend to use the manual measurement.
The new models are able to use Bluetooth and WIFI. The new model are easier to use and don`t need a hotspot. See Points for more information.
The discontinued S910 model only supports a WIFI connection.
Tip
Due to the weak WIFI Signal of the S910, we suggest to use the Hotspot mode.
Mount the Leica Disto S910 on the tripod mound and the tripod
Place the tripod on a position on stage where you are able to reach the origin, the X+ axis mark and as many anchors and cp calibration points as possible with the laser.
Level the tripod
Turn ON the Leica Disto S910 and open up a WIFI Hotspot on the Leica Disto S910
Press FUNC on the Leica Disto S910
Tap P2P in the right bottom corner and press = on the keyboard
Level the Leica Disto S910 (Device uses a guide)
Connect the tablet to the Leica WIFI Hotspot
Open the zactrack APP on the zactrack tablet
Go to Show Editor and tap Points on the bottom
Tap Disto Status
Tap Discover to get the current ip address of the Leica S910 Disto and tap Ok
The Leica Disto S910 is now ready for measuring