What's new in zactrack?
We're thrilled to announce our fourth release of the year, packed with exciting new features designed to enhance user experience.
This update brings high and low update rates and expanded diagnostic tools for SMART + MINI, along with the introduction of a new Patch Import system via MVR-XCHANGE. Plus, we're pleased to announce compatibility with the Leica X3, X4, and X6 3D Disto series.
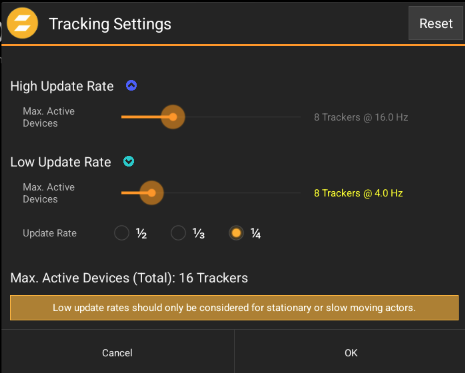
High & Low Update Rate (SMART & MINI)
 New in this release
In this release, users can choose between high and low refresh rates across trackers.
Trackers are configurable in the new Tracker Settings dialog within the Actor's tab of the Show Editor.
 |
 |
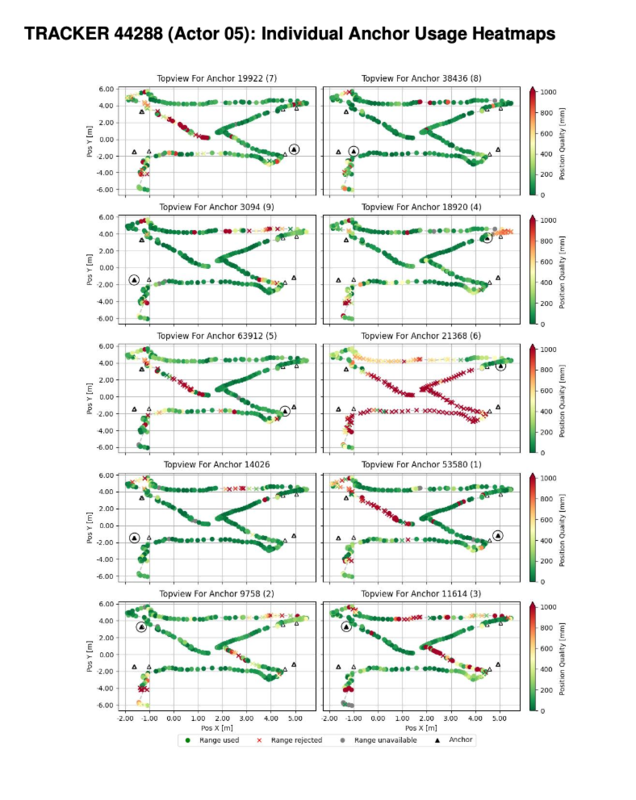
Diagnostic PDF Reports (SMART & MINI)
New in this release
For troubleshooting, reports can now be generated to show each tracker’s connection quality with individual anchors, including any fluctuations in the connection.
This tool is invaluable for optimizing anchor and tracker placement, allowing users to identify potential sources of connectivity issues in their setup.
 |
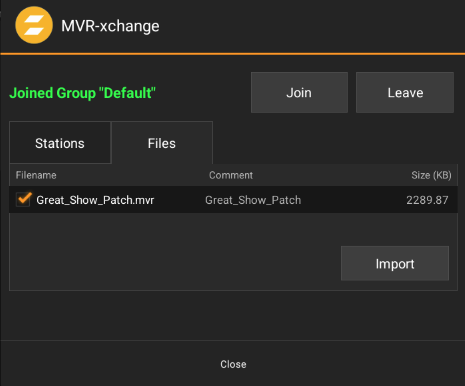
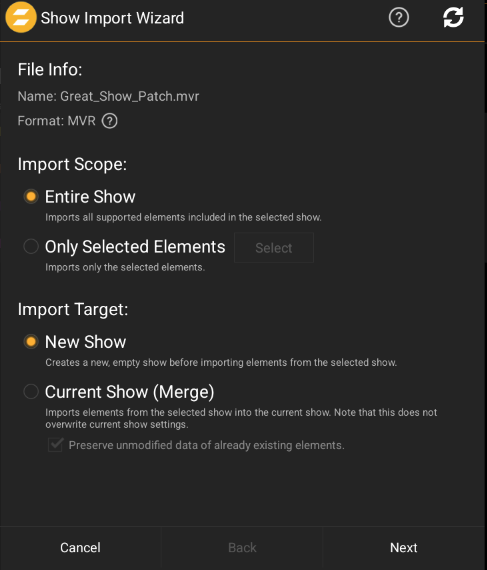
MVR-XCHANGE Import
New in this release
The MVR-XCHANGE Import feature is now part of the My Virtual Rig (MVR) file import system, allowing zactrack to import MVR files exported from compatible third-party devices.
With this system, users can import the entire file or select specific elements for import, providing greater flexibility and control.
 |
 |
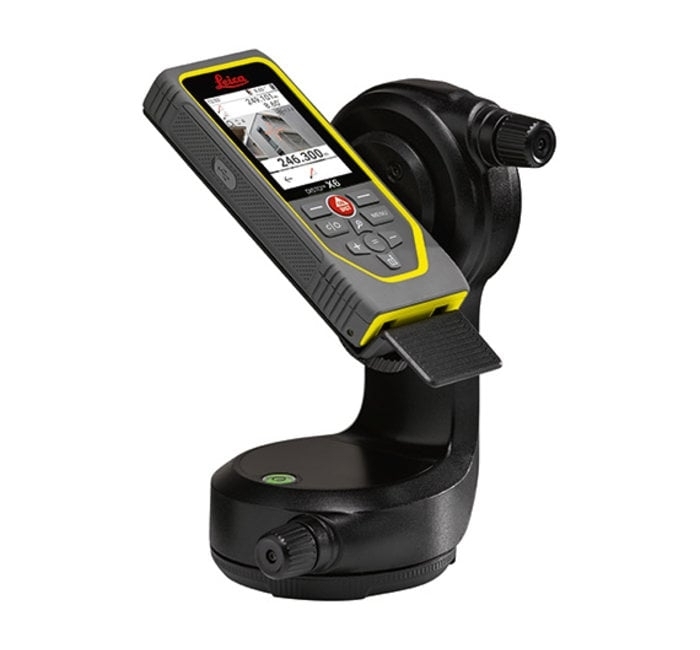
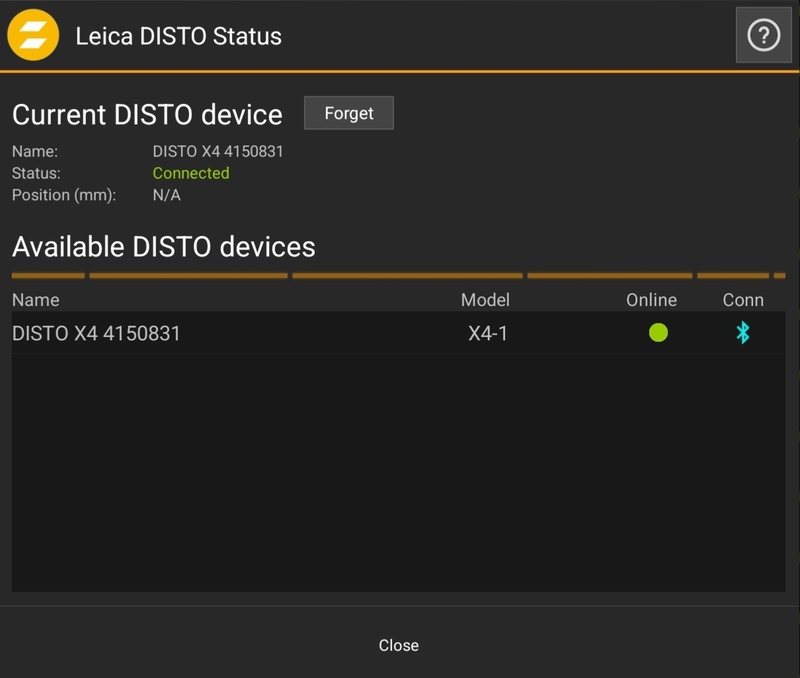
Support of Leica X3, X4 and X6 Series
New in this release
zactrack now supports the Leica X3, X4, and X6 series, along with continued support for the Disto S910.
The new Leica Disto Status Menu provides real-time visibility of your current Disto device and any nearby available Distos. This update supports both Bluetooth and WiFi connectivity (S910 WiFi only)
 |
 |
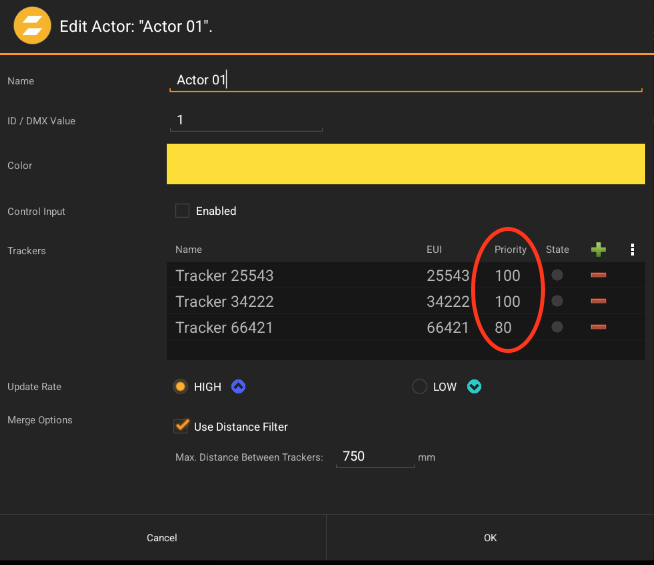
Tracker Priority (SMART Only)
New in this release
Trackers can now be assigned priority levels, determining which ones occupy active slots when the demand for active slots exceeds availability.
Tracker priorities are independent of the Actor, allowing multiple trackers assigned to a single Actor to have different priority levels.
 |
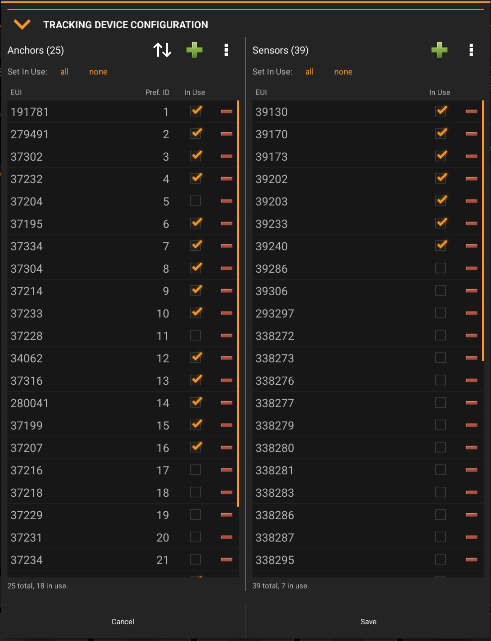
Device Settings - "In Use" Flag for a subset of Anchors & Trackers
New in this release
Define your used devices of PRO Anchors and Trackers directly within your Device Settings.
This setup allows for a larger pool of available devices without occupying active slots with unused ones.
 |
50+ Fixes and Implementations
Transmission Power Offset Dialog (SMART, MINI): Added in System Settings for precise adjustments.
New Landing Page: An updated interface for easier navigation and accessibility.
System Calibration Wizard: Anchors are now added to shows using their preferred ID for improved organization.
Terrain WIZARD: Fixed potential crash with Android 8 or lower
Fixture Alignment Dialog: Enhanced UI updates for a smoother user experience after completing tasks.
Centralized Loading System: Implemented to boost performance and reliability.
WEB Monitor: The sidebar now displays more detailed information about each anchor.
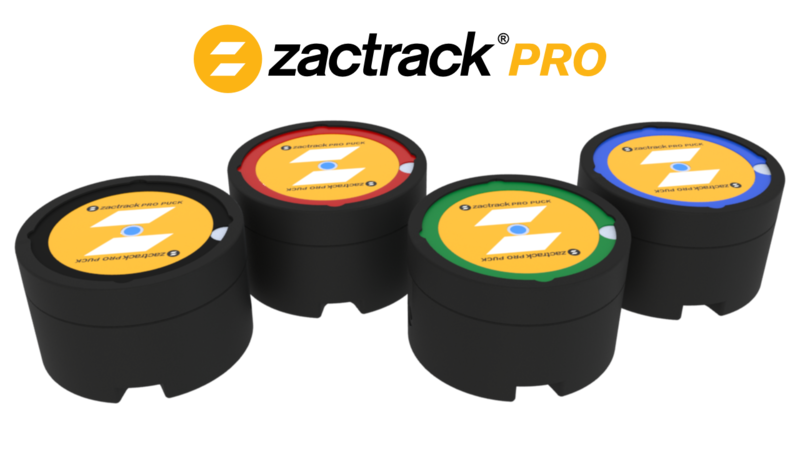
PRO Puck Integration
New in this release
We are very happy to announce that our colored Pucks are now available for zactrack PRO!
You can now calibrate your PRO anchors and semi-automatically center and align your fixtures using our well-known Wizards, just like with zactrack SMART!
 |
Go to
 Menu Dots and tap on System Settings
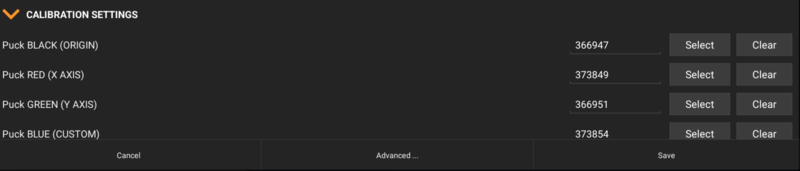
Define your 4 PRO Pucks according to their colours within the Calibration Settings at the bottom
Go to the Points section within the Show Editor
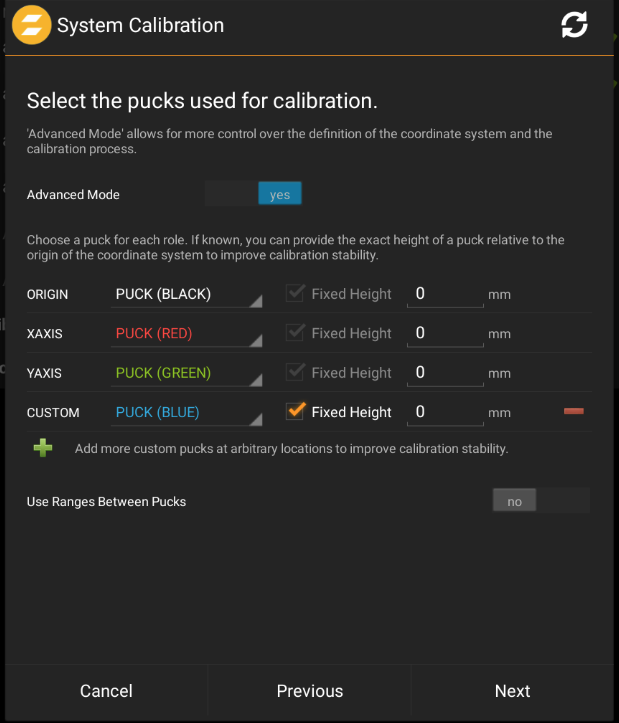
Use the System Calibration Wizard together with our new zactrack PRO Pucks to calibrate your anchors
Go to the Fixture section within the Show Editor
Use the Fixture Alignment Wizard together with our new zactrack PRO Pucks to semiautomatically centre and align your fixtures

Note
Please be aware that all zactrack PRO servers purchased before September, 2022 require a separate zactrack PRO Tracking Server Upgrade V5 to enable the usage of our new zactrack PRO Pucks.
Minor Implementations & Fixes
Improved Import of GDTF files
Show the number of assigned fixtures in analyzer
Updated fixture library
We're really excited for the second release of the year as we have prepared some new exciting features for our customers.
We are introducing new trace modes into our Live Mode for diagnostic purposes, added over 300 new fixture types to the fixture library and also implemented CSV Import for a simplified patching import.
Actor Trace Mode
New in this release
Trace Modes are now offered in the Live View. This will help with diagnosing the tracers connection to anchors and how much variance there is in the measurements it is receiving from the anchors.
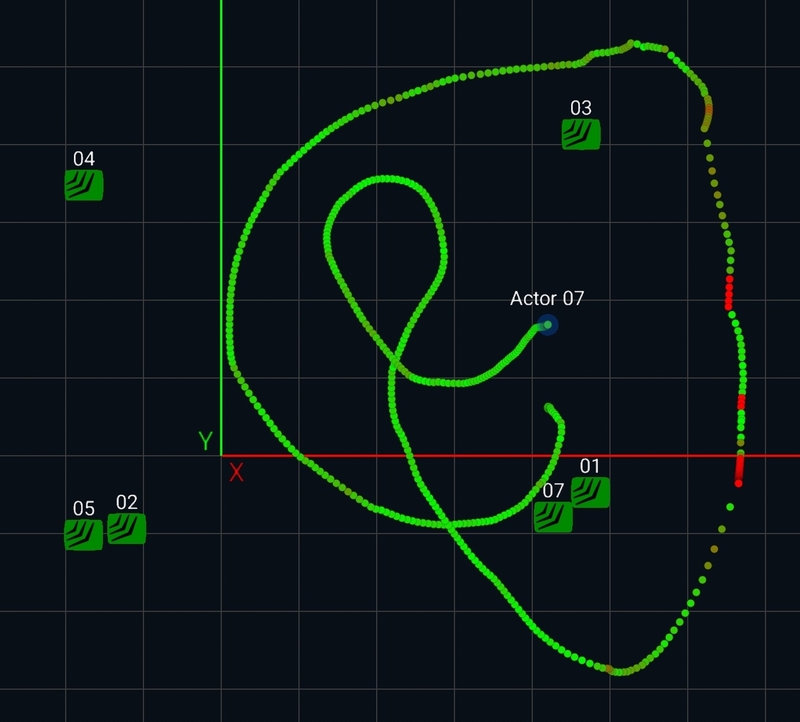 |
Example of Range-Position Difference Trace Mode
Note
This feature is only available with the zactrack Smart and Mini systems.
Go to the Live View
Click
 to access the Live View Settings
Enable Traces

Set the:
Max Number of Trace Points - sets how many trace points created by your Actor's movement in the Live View will be used drawn Trace Mode - sets what the trace points created by the Actor will indicate Actor Filter - determines which Actors will create trace points
Actor Color - The default Trace Mode settings. This setting uses the Actors Color to indicate where the actor has moved within the Live View.
Anchors Used - The color of the trace point indicates the number of anchor ranges used in the position calculation.
Green - All connected anchor ranges were used. Red - Only the absolute minimum number of anchor ranges were used. Note
For merged actors, the color of the tracker with the lowest number of anchors ranges is shown.
Range-Position Difference - The color of the trace point shows the difference between the available anchor ranges and the calculated tracker position.
Green - Small difference between the ranges and the position. Red - Large difference between the ranges and the position. Note
For merged actors, the color of the tracker with the largest difference is shown.
Individual Tracker Positions
New in this release
When Actors have multiple trackers assigned to them it only shows up as one point in the Live View, creating one Trace Line. However we now have the option for all trackers assigned to Actors to show up as individual points in the Live View.
This is turned on through the Live View Settings.
Go to the Live View
Click
to access the Live View SettingsEnable Individual Tracker Positions
 |
CSV Patch Import
New in this release
The patch can be imported by:
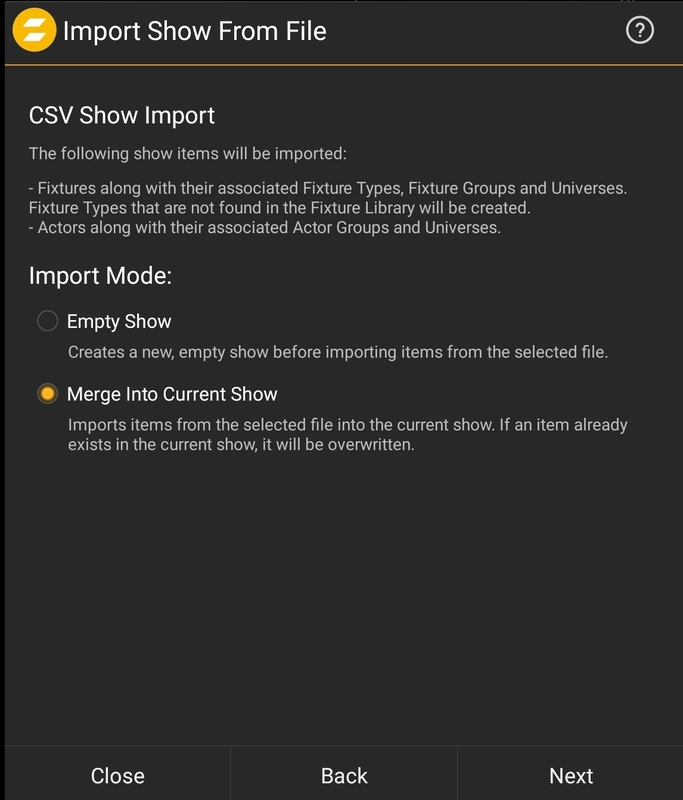 |
Pop Up Window of a csv Show Import
CSV File Format Description
Below you will find an example of the CSV file format.
CSV FORMAT TO IMPORT FIXTURE AND ACTOR PATCHINGS

ENTITY_TYPE;ID;NAME;FIXTURE_TYPE;GROUP;OUT_UNIVERSE;OUT_STARTCHANNEL;OUT_PROTOCOL;OUT_PRIORITY;IN_UNIVERSE;IN_PROTOCOL;CONTROL_UNIVERSE;CONTROL_STARTCHANNEL;CONTROL_PROTOCOL;POSITION_X;POSITION_Y;POSITION_Z;ROTATION_Z;ROTATION_ZX;ROTATION_ZXZ
FIXTURE;1;;AstraWash7PIX (Standard_25ch);Truss 1;2;1;SACN;110;2;;10;1;;;;;;;
FIXTURE;2;;AstraWash7PIX (Standard_25ch);Truss 1;2;26;SACN;110;2;;10;12;;;;;;;
FIXTURE;3;;AstraWash7PIX (Standard_25ch);Truss 2;3;1;SACN;110;3;;10;23;;;;;;;
FIXTURE;4;;AstraWash7PIX (Standard_25ch);Truss 2;3;26;SACN;110;3;;10;34;;;;;;;
ACTOR;1;Actor 01;;;;;;;;;11;1;;;;;;;
ACTOR;2;Actor 02;;test2;;;;;;;11;6;;;;;;;
ACTOR;3;Actor 03;;test3;;;;;;;11;11;;;;;;;
ACTOR;4;Actor 04;;;;;;;;;11;16;;;;;;;
ACTOR;5;Actor 05;;;;;;;;;11;21;;;;;;;
ACTOR;6;Actor 06;;;;;;;;;11;26;;;;;;;
Note
Only fixture and actor patching as well as some additional attributes are supported. Click on the '?' in the SHOW IMPORT DIALOG or simply export a test show to a CSV file in order to learn more about the used CSV file format.
CSV File Format Description
The CSV file must begin with a mandatory header row. Every other row represents a fixture or actor. Columns are separated by semicolon (;)
The available header columns are:
Header Column | - | Attribute |
|---|---|---|
ENTITY_TYPE | required | Fixture or Actor |
ID | required | The Fixture ID or the Actor DMX-ID |
NAME | required for Actor | The name of the Actor. |
FIXTURE_TYPE | required for the Fixture | The name of the Fixture Type |
GROUP | optional | The name of the Actor or Fixture Group |
OUT_PROTOCOL | required for Fixture | SACN or ARTNET |
OUT_UNIVERSE | required for sACN or ArtNet | The Out universe ID |
OUT_STARTCHANNEL | required for sACN or ArtNet | The Out and In universe start channel |
OUT_PRIORITY | optional for sACN | The Out universe priority. |
IN_PROTOCOL | optional for Fixture | sACN or ArtNet |
IN_UNIVERSE | required for sACN or ArtNet | The IN UNIVERSE ID |
CONTROL_PROTOCOL | required | sACN, ArtNet, OSC |
CONTROL_UNIVERSE | required for sACN or ArtNet | The In universe ID |
CONTROL_STARTCHANNEL | required for sACN or ArtNet | The Control universe start channel |
POSITION_X;POSITION_Y;POSITION_Z | optional for Fixture | The entity XYZ position in meters |
ROTATION_X;ROTATION_Y;ROTATION_Z | optional for Fixture | The entity XYZ rotation in degrees |
The patch for Fixtures and Actors can now be imported via a .csv file. This can be done in a new showfile or merged into an already exisiting showfile.
Tap on
in the top right hand cornerImport Show
It will only show up in the list if the .csv file is in the zactrack>shows folder. If not in that folder you can choose Import From to find it on your device.
Once the file has been selected press Import.
New fixture Types
New in this release
Over 300 new fixtures types were added to this version.
The manufacturers whose Fixtures you will find in our library are:
Ayrton
Clay Paky
Elation
GLP
Eurolite
High End Systems
JB-Lighting
Martin
Device Settings for Smart and Mini
New in this release
Note
Trackers are referred to as Sensors in this menu.
Even if anchors and trackers are not yet patched into a show file, they can be assigned an ID in advance. This way, when they come online, they will already know their designated ID. This is done through the Device Settings menu.
Going to the
in the top right hand cornerSystem Settings
Advanced
Device Settings
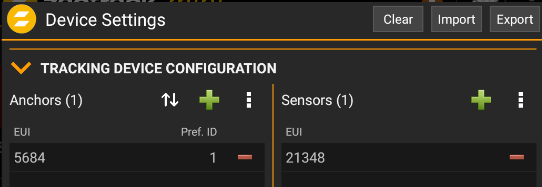
Anchors are added by pressing the
on the left hand side of the window.In the Add Anchor Configuration popup fill in the EUI and Preferred Anchor ID.
You can press Add to keep this window open and add more Anchors. Or press Add & Close to return back to Device Settings
Trackers or Sensors are added by pressing the
on the right hand side of the window.In the Add Sensor Configuration popup fill in the EUI for any Trackers you want to be apart of your show.
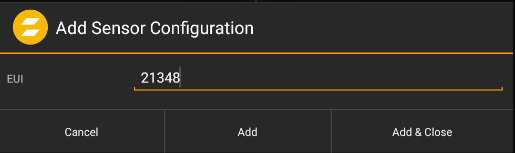
You can press add to keep this window open and add more Trackers. Or press Add & Close to return back to Device Settings
When finished added Anchors and Trackers press Save
Other Enhancements
Added option to only show traces for a specfic actor.
Added option to clear all current traces.
Flux and Coda Audio presets added to the OSC Fixture Type.
Users are now able to use decimals when selecting mode "Range (float)"